Video Editing - Beginning
last update: 7 January 2023
We all collect the odd video, and I've got a few short ones, more like little clips, in my Photos collection.
But finally I decided to scan my small collection of old videocassettes.
I ended up creating 20 AVI videos from my old collection of cassettes, with files sizes varying between 218 MB and 2.48 GB. I also had a 1 GB mp4 video, but I don't know when I made it. I'm dealing with videos that were taken at least 30 years ago. So poor quality videos with no information on the content (place, date, who, etc), but I can always guess and interpellate, and hope for the best.
As far as I can tell:-
All the videos were taken in a period between 1987 and 1991
I used 2 different camcorders, one recording on full-sized VHS tapes, but the majority of videos were recorded on VHS-C (mini format)
I think I must have borrowed a camcorder that used full-sized tapes, and then I decided to buy a Panasonic and adopt the VHS-C format
I haven't been able to spot the exact camcorder model I purchased, despite it having quite a unique grey clamshell plastic case with very smooth rounded edges (and a shoulder strap)
I remember giving up on the camcorder because I found it too cumbersome to carry around, and in reality we never really looked at the videos (just put them away in a cupboard)
I remember giving the whole set (camcorder, travel case, charger, new cassettes, etc.) to my Dad, but I don't think he used it very much either
Judging from the content I must have at one time add titles to two tapes, made a compilation tape from several videos, and even put a sound track on one tape
I only put the date on two videos, so part of my problem was to figure out when and where I took the original videos (Google Image Search is a great help).
How did I digitise my old videocassettes?
I know that I left my old Hitachi video machine with my collection of cassettes in the garage for the best part of 30 years. I didn't want to use a professional digitisation service because I was not even sure what was on the cassettes (if anything). The first thing I did was to connect the old video machine to a TV screen to see if it worked. It worked, but I noticed that for some cassettes there were considerable distortion and noise. Also the quality of the video in general was poor by todays standards.
One of the problems was that I could not find any video tutorials for my particular Hitachi video recorder, so nothing on how to clean the heads and rollers, or how to adjust the tracking, etc. But there were some videos tutorials on how to repair, clean and adjust the tracking on some other models. Viewing enough of these videos gave me an idea about the basic components, and what to do and not do.
What to do with my AVI videos?
I ended up creating 20 AVI videos from my old collection of cassettes, with files sizes varying between 218 MB and 2.48 GB. I also had a 1 GB mp4 video.
The first thing I wanted to do was convert the AVI into .mp4 videos, and secondly I want to extract the most interesting clips of my wife, family members, friends, etc. I must admit most of the video content was just tourist padding that I could delete. Also there was a lot of heavily distorted video, despite my best efforts to clean my video machine and adjust the tracking. So my aim was a series of shortish .mp4 videos which I could send to family and friends.
According to one independent review the best video editors are:-
Movavi Video Editor for Mac - has a free version and is an easy-to-learn editing tool.
Filmora for Mac - powerful video editing application with an array of advanced features.
Final Cut Pro - well-known professional video editor, stands out for its user-centered design.
iMovie - a simple video editor with basic editing capabilities.
Kdenlive - open-source video editor characterised by simplicity.
Blender - open-source and free video editing software with great functionality.
Avidemux - open-source and free video editing software, whose main characteristic is user-friendliness.
My gut feeling was that iMovie was my best option because it's easy-to-use and I'm only interested in doing some very basic editing. And on top of that iMovie is the default video editor for Mac users, and it's free. But otherwise Avidemux might have been an alternative because of its user-friendliness.
First problem - iMovie does not support AVI
During the time it took to download iMovie (its 3.26GB), I checked out How to Use iMovie - Beginner's Guide.
I immediately discovered that iMovie did not support AVI, even if some "experts" wrote that it did. It's possible that it might support some "versions" of AVI, but in any case it did not support my AVI files.
What was the reason? According to an answer on Quora, and I quote,…
iMovie can import QuickTime (.mov), MPEG-4 (.mp4, .m4v), MPEG-2, MPEG-1, 3GPP, 3GPP2, AVCHD, DV, and AVI files containing MJPEG (motion JPEG) data.
AVI (Audio Video Interleave) is a container format, i.e. a file that contains chunks of data that can be stored in a variety of ways. It was introduced by Microsoft in 1992, and it is based on the IFF file format developed by Electronic Arts for the Amiga computer in 1985. AVI was developed before modern video codecs and video compression, but it was designed to store arbitrary chunks of audio and video that your computer would have to figure out how to play by consulting a list of decoders that are installed on the computer. The thing about AVI is that the data stored inside it could be just about anything.
AVI has some drawbacks that make it difficult to use for modern video and video editing software:-
It doesn't have a standard way to represent time codes, so syncing audio and video is complicated.
It doesn't have a way to represent the aspect ratio of the video.
It wasn't designed to be used with video compression approaches where one frame is based on the frame that precedes it (like all modern methods)
It doesn't support the notion of variable bitrate (VBR) data, presuming that one can find a chunk of data by dividing the size of the video chunk by the duration.
The response to these limitations has frequently been to adding proprietary stuff into AVI that is handled separately by different companies that do it.
The practical upshot being that almost no video editing software supports AVI files generically, and all of them end up converting it to another format during the import process and using the converted version.
OS X doesn't really support AVI, or much of anything outside what the Moving Picture Experts Group (MPEG) standardises on. For the most part, that's just fine since that's pretty much what everyone else does today too.
If you'd like to convert the AVI files to H.264 (MPEG4), there's a wide variety of utilities out there that do just that. There's a good chance that VLC will read your AVI and convert it without a problem.
My version of VLC Convert created a 278.4 MB m4v file from my 455.4 MB AVI file, m4v being an Apple MPEG-4 movie format that could be imported by iMovie. But the problem was that VLC Convert creates an m4v file using its default settings, and the result is that the video plays without the audio track using the QuickTime Player, but plays properly in VLC. It is possible to change the default video player from QuickTime to VLC, but that did not solve the next problem.
Worse still, importing these VLC .m4v converted files in to iMovie also left off the audio track.
Fortunately, there is a posting that noted that changing "MPEG Audio" to "MPEG 4 Audio (AAC)" in VLC Convert, and doing the conversion again delivered video and audio on VLC, Quicktime and in iMovie.
You can verify this by simply opening the "Info" window on a .m4v file and on a .mp4 file. The codex on the m4v file will be H.264 and the codec we wanted was H.264, AAC.
How to change the audio codec on VLC?
On the Mac version, open VLC and go to Convert/Stream… under File.
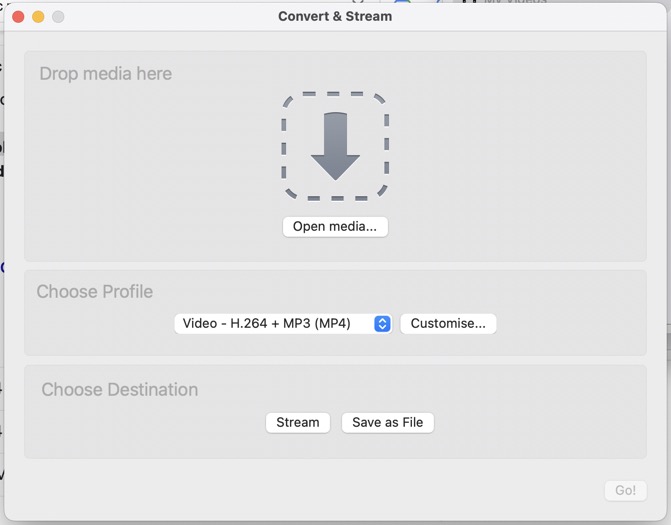
We can see that the profile is Video - H.264 + MP3 (MP4) which looks like it should do the job, but we know it does not. Converting an AVI file produces a m4v file (which can be renamed with the extension .mp4), but when played back with the QuickTime Player or dragged in to iMovie the audio track is missing (but the audio track is still there when using the VLC player).
The next step is to Customise…, which open options for selecting both the video and audio codecs.
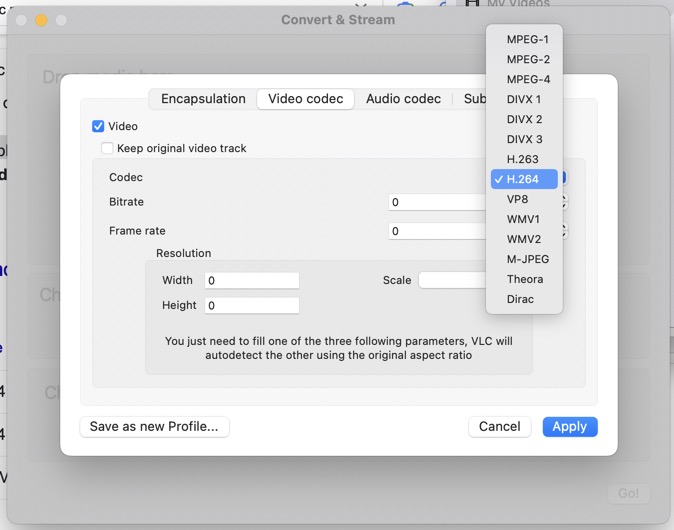
Above we can see the video codec correctly set to H.264, and below we can see the audio codec.
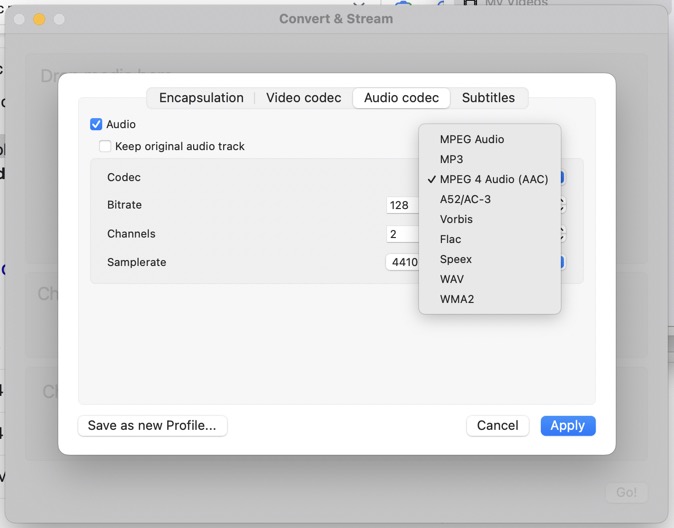
Here it was originally set to MPEG Audio, but we changed it to MPEG 4 Audio (AAC). You need to "Apply" and "Save as a new Profile…". I gave this new profile the name H.264 + AAC, which was presented in my list of profiles as H.264 ° AAC.
Now when converting an AVI file I must select conversion using my new profile H.264 ° AAC, then give a new file a name and location in "Save as File", then Save. The conversion time by VLC will depend upon the length of the video. The file will now play with its audio track using the QuickTime Player, and can be imported into iMovie with its audio track. After conversion, the newly created file will indicate under "Get Info" that the codec is now H.264, AAC (and not just H.264).
The newly created .m4v file can simply be renamed a .mp4 file without losing the audio track.
And just to make life that little bit more confusing…
Above I have just explained how I converted an AVI video file to a mp4 file with its audio track. And that under "Get Info" the codec was now H.264, AAC (and not just H.264).
I also had a 1 GB mp4 file of trips we made to the US (in summer 1991). I presume that I must have edited different clips together at the time. Under "Get Info" the codec is simply H.264, and it played with the audio track using the VLC player. However it plays without the audio track with QuickTime, and also without the audio track in iMovie. So how to correct that?
It would appear logical to use VLC to also convert my old 1 GB mp4 file to a new mp4 file with the H.264 + AAC profile. But what that did was produce an 85.6 MB m4v audio file of the separate audio track taken from the original mp4 file, i.e. no video.
I tried different options in the hope that I would accidentally hit on the answer, but to know avail.
On the other hand I did have my complete mp4 video, albeit with a non-functioning audio track in QuickTime and iMovie. I also had a separate but perfect good mp4 audio file captured from my video.
So the next step was to figure out how to merge the two using iMovie. My initial idea was that I could "stitch" the audio tack back onto my video, and then save it a a new mp4 file. My idea was that it could not be that difficult since iMovie can insert sound effects and also add background music.
There were even some video tutorials about syncing video and audio tracks, enough for me to grasp the basics. The biggest problem was that the audio track was longer that the video, and it was different to initially find a way to sync the two. The tutorial videos I found on the topic dealt with small syncing problems, e.g. lip sync or syncing a separately recorded music track to a music video.
Finally I found a very specific clip of an American Indian dance, and I found the exact piece in the audio track, both 1 minute 45 seconds long, but out of sync by 2 minutes 17 seconds. I could not find a way to slid the video and audio tracks that much, so I started by cutting 2 minutes 17 seconds of the front on the audio track.
The rest of the audio was almost entirely background 'noise' to the video, and when I synced the American Indian dancing with the music, it tied-in almost perfect. And the rest of the audio track was only out by a second to two, and all of the audio was background (i.e. no lip sync, etc.). So this simple solution was perfect for my needs.
I was then able to save a new mp4 file that VLC, QuickTime and iMovie would play with the sound track. In iMovie I could now edit my new mp4 file, and save the final cut as a 4.49 GB mp4 file.
There is probably an elegant solution out there somewhere, but still, job done.
Back to iMovie
Having worked out how to convert AVI files to mp4 (with the audio track), the next step was to decide what to do with the new mp4 files.
My first step was to view the videos and identify key elements in the video, i.e. places, people, and if possible the date(s). Of course the fact that the videos were all about 30 years old didn't help, but Google Image search actually helped identify certain buildings, etc.
Next, I had a look at a few beginner "how to use iMovie" tutorials. I already mentioned How to Use iMovie - Beginner's Guide which I found far more interesting and complete than I had initially expected.
The next I looked at was Learn HowTo Use iMovie in 5 Minutes, which was a bit too quick, but was useful after having looked at my first tutorial video.
However, the next one was probably the one I should have looked at first, a 32 minute tutorial called iMovie for Beginners - Detailed Tutorial. I also found useful both a 25 minute tutorial How to Use iMovie - 2022 Beginner's Guide and a 40 minute How to use iMovie in 2022 (Beginner's Guide).
However many of the video tutorials focus on dragging and dropping different media (e.g. videos, photos, etc.) into a timeline, to create a kind of edited "super video". What I was more interested in was different. Firstly, I wanted to delete the stuff I did not want/need, mostly blue screen or badly distorted parts. Secondly, I wanted to create a much shorter but useful video of what ever I had filmed, i.e. edit out the boring bits such a scans across walls or when I zoomed into a trivial detail. Thirdly, I want to also extract key bits (e.g. with my wife), date and locate the bits, and group them into a separate timeline. And then there are questions such as do I want to put some titles on the different clips, etc.?
I actually had running How to use iMovie in 2022 (Beginner's Guide) as I tried my first edit. The key steps I used involved importing and manipulating the timeline, clipping out the bits I did not want (blue screen, distorted footage, and just junk), and saving the result.
But why does a 1.36 GB AVI file become a 1.01 GB m4v file after conversion with VLC, but then, after having been shortened during editing with iMovie, end as a 4.72 GB mp4 file?
I think my videos might have been recorded at 360p (480x360), but I'm not sure (couldn't find information about the resolution of camcorders in 1989-91). They are certainly not good quality, or even acceptable quality by todays standard. My understanding is that the resultant default resolution for an iMovie file is 720p (1280x720), and this despite the original input video files being of a much lower resolution (there is an alternative output at 540p). Experts tell me that one of the reasons is that iMovie unpacks the compressed originals for editing, and exports the output in a less compressed format. Others say that the resultant video is also sampled at a higher bit rate, despite the fact that the additional resolution of the source material does not merit it. I also output my iMovie files at a quality level "High", and not Low, Medium or Best, but I did also Compress at "Better Quality" and not "Faster". So all this means that the final output file has little to do with the original input file(s), and unless heavily cropped, will always be bigger.
Fundamentally I was happy with the result. I had a sequence of film "clips", with all the "rubbish" removed.
My next step was to merge a few of the videos, and the simplest example was to merge two videos one after the other.
What came next was to fuse together 4 videos, and alter the sequence of clips to create a proper timeline of our visit to Florida in 1989. This turned out to be far easier than I had first imagined.
Also adding titles and additional info. along the timeline was very easy.
I spent the most time solving the audio track problem on my old mp4 file, but even that was limited compared to just her time to run through the videos, editing, and re-editing, etc.
What next? Not sure there is a what next.
I have converted my video cassette collection into 20 AVI files. Then I have edited down those 20 AVI files (and the one mp4 file), and I now have 14 mp4 files. If anything I may still edit each file to make it even smaller, but we will see.