Web Authoring with RapidWeaver - what I've learned so far
last update: 24 May 2021
When I first started to create my website, I needed two things. Firstly a host, and secondly, a simple, easy to use website authoring tool.
For the website authoring tool I picked iWeb, Apple's WYSIWYG template-based tool which came as part of the early iLife software suite. At the same time Apple also offer a hosting service called MobileMe, which in 2012 was replaced with the iCloud.
In early 2011 I decided to move my website to a different host. I honestly can't remember why I picked SiteHQ, but I must admit so far they have provided an excellent service.
Moving from iWeb to Sandvox
Before Apple introduced iCloud, it had already stopped developing iWeb in 2011. However I continued to use it through to 2016. iWeb worked perfectly for me, but there were increasingly reports of its instability as operating systems evolved, so the "writing was on the wall".
Finally I started to hunt around for an alternative, and after looking at a variety of options, I picked Sandvox. I just felt that it looked well established and it appeared to offer the easiest migration path out of iWeb.
Migration actually was more problematic than expected. None of the standard templates offered a full screen width page, so I went with the add-on webpage template Apex by Blueball Design.
Also Sandvox had offered the option to simply migrate a whole website from iWeb to Sandvox. This might have been possible for a website with an ultra-simple layout, but my website could not be automatically migrated. I had to start doing the migration by hand, webpage-by-webpage.
It must be said that authoring tools such as Sandvox offer features I don't need, for example "a wide range of designs", when I just use one. Nor do I need flexible photo galleries, social media features, blogging tools, or "code that aids organic discovery by search engines like Google and Bing". However I do want drag-and-drop publishing and the ability to drop text, images and photos directly into my webpages. The idea that the authoring tool would generate HTML 5 code that would be compatible with different browsers on different platforms also sounded useful.
Responsive Web Design
One of the selling-points of Sandvox (and RapidWeaver - see below) is that they support 'responsive web design', or the ability to make webpages render properly across a variety of devices and screen sizes. This sounded like a positive point, but it actually turned out to be a major constraint. I had to move my old website page-by-page across to my new Sandvox site. On the positive side this allowed me to validate and update its content and layout. But I found that I could not simply copy-and-paste or drag-and-drop a whole page (a formatted collection of text, links and images) out of iWeb and into Sandvox. This appeared to be a problem with OS X, or at least an incompatibility between iWeb, OS X, and Sandvox. I could copy-and-paste text, but not if it contained embedded images. Nor could I copy-and-paste by passing through Pages or Notes. The Sandvox people suggested to copy-and-paste chunks of text, and separately to copy-and-paste each image into TextEdit and then drag-and-drop it into the Sandvox page. This worked.
An additional problem was that the clipboard (or pboard in Mac-speak) is known to have problems. After using the clipboard a few times it would get stuck and not accept any new 'copied' content. It would just paste in the last image to have been successfully copied across. So I would then have to empty the stuck clipboard before continuing.
The next problem was with the images that were copied into Sandbox. In iWeb I would expand the image to occupy a substantial portion of the webpage, or layout several images along with a small text box nearby. The implication was that my webpages were only really designed to be viewed on a full-screen desktop or portable computer, although they looked fine also on an iPad. Moving the image across to a Sandvox webpage often produced an image of a different size. Occasionally the image would be so small as to be ineffective in the context of the webpage. The Sandvox people explained this by saying that a 'responsive' authoring tool requires that the images are stored separately in their 'native' size, and displayed according to the screen of the viewing platform used.
In addition, if I selected a series of images, and then copied-and-pasted them into TextEdit, and then dragged-and-dropped them on to my Sandvox webpage they would actually move over as a single composite image. All this was irritating. Most of the time I could live with the situation, but sometimes I would have to source a replacement image in the hope that it would look better on my new Sandvox webpage. In almost all cases the image was not exactly the size I wanted, but I learned to live with it.
The 'last straw' with Sandvox
Not that I'm a camel, but my next problem with Sandvox was again to do with images. I had accepted that I would need to paste into each Sandvox webpage a whole series of images taken from my old webpages one-by-one. Unfortunately after saving the resultant file I would then find that some of the images were not saved within the webpage. The missing images would be replaced by simple placeholders. I would have to go through the same routine several time in order to get all the images loaded into the webpage and saved. I could only then publish the completed webpage.
I had logged this problem with the Sandvox service support on the 17 March 2018 (Case 283870), and they had immediately suggested a couple of things to do. On the 22 March 2018 they asked for some videos of the problems. I sent them several videos on the 22 March 2018 and on 25 March 2018. Until then the support from Sandvox had been rapid and they were usually able to give me a fix or a way to get around the problem. But on this problem they remained silent.
My finally problem was much 'easier'. Sandvox simply no longer uploaded my webpages to my host. I logged the compliant on the 15 April 2018 under the same Case file. I never received a reply.
Moving from Sandvox to RapidWeaver
After a couple of weeks I decided to "cut my losses" and move this time to RapidWeaver. I think it was version 7.
Many users commented on the fact that RapidWeaver had two modes, Edit and Preview. These two options were self-explanatory, but it is worthwhile noting that there were four 'Preview' viewing options: full-width, iPad landscape, iPad portrait, and iPhone. Implied in the 'Preview' is the fact that RapidWeaver is not WYSIWYG, so you do all the work in 'Edit' mode, and then you have to 'Preview' to see what the webpage will finally look like on one or other output device.
Getting started with RapidWeaver was actually very easy, given my past experience with iWeb and Sandvox. The getting-started video's introduced the basics in a simple and efficient way.
One of the things you see mentioned often is 'Stacks', which offer additional layout options presented as a type of third-party plugin or add-on. In fact 'Stacks' also supports 100's of widgets for taking payments, displaying sliders, videos, text columns, feature boxes, animations, etc. At the time the most recent version 'Stacks 3' was supposed to turn RapidWeaver into a professional-grade web development tool. 'Foundation' was a responsive front-end for RapidWeaver based upon the Foundation Framework, a collection of HTML, CSS and JavaScript for designing websites. Foundry was a free-form framework for RapidWeaver, and was compatible with Bootstrap, an open-source front-end library for designing websites. These add-on's provided a valuable platform for developers who build websites for professional clients demanding robust and secure e-commerce functionalities. To get a better idea about the usefulness of these options check out these video tutorials available at the time:-
Stacks Basic Introduction - RapidWeaver 7 for Beginners Lesson 5
Tidy Up - RapidWeaver for Beginners Lesson 6
Foundry For RapidWeaver Introduction - RapidWeaver for Beginners Lesson 7
Foundation for RapidWeaver Introduction - RapidWeaver for Beginners Lesson 8
Whilst there were many positive comments on the forum about 'Stacks', I preferred to adopt a single, simple template from the basic collection, the 'Lander' template, without any "bells and whistles".
Initially I found 'Edit' and 'Preview' appeared to have some quirky features linked with copy-and-paste. When compared to Sandvox I'm happy to say that I can copy-and-paste webpages out of Sandvox and iWeb directly into RapidWeaver pages. Whilst often everything looks fine in 'Preview' there were some oddities in 'Edit'. Some images were shown just as framed blank spaces in 'Edit', and on occasion some images were just place holders in 'Preview'. All images were initially pasted in as left-aligned. Some images extended beyond the width of the webpage. Additional empty lines appeared around bold titles and below images. For some of the larger images, the next block of text overlapped the lower part of the image. The option 'justify' for text in 'Master Style' appeared not to work for italics when cut-and-pasted into a RapidWeaver webpage. These quirky features were irritating, and were symptoms of something more important.
After some discussions with experts on the RapidWeaver forum the reasoning became clear. The RapidWeaver templates impose a very precise set of formatting options. So the best thing to do is 'clean' the page to be pasted into RapidWeaver, removing the italics, bolds, and ensuring that all is pre-justified. Then once pasted into the RapidWeaver webpage, 'select all', 'clear formatting' and reset the font as 'Arial' (all the necessary commands are on the bottom of the 'Edit' page). Then 'select all' and underline all followed by remove-underline to remove the underline on hyper-links (the template I'm using does not underline hyper-links). Different titles are predefined by 'Headings 1-6' (I use 'Headings' 1 and 2, and occasionally 3 or 4). Subscript and superscript also have their own menu commands. And the template automatically inserts blank lines around headings and embedded images, so there is no need to leave blank lines as part of the webpage layout. Even paragraphs automatically have a blank line inserted into the webpage design. Apparently 'bold' works as normal, except you can't bold text that is tagged as a Heading.
One user noted that 'option+command+v' (and not just 'command+v') will strip all special formatting and past in text with the theme/webpage default.
Much on the information on the rest of this webpage is about learning (or re-learning) how to configure a webpage in RapidWeaver so as to both conform to the template standards and to exploit the various options on offer.
Copy-and-paste images
Moving from one authoring tool to another starts with trying to use copy-and-paste to drag the contents of old webpages (with different types of embedded images) into the new authoring environment. With both Sandvox and more recently RapidWeaver, there were some initial problems. I described the problems on the RapidWeaver forum and a few people suggested to try to scrupulously follow the template guidelines and above all to only use JPEG and PNG for images, photographs, graphics, etc., and to drop TIFF. Clearly JPEG has quite a number of advantages, since it is a stable and versatile format with a small file size. JPEG represents about 45% of image requests on the web, PNG about 23%, and GIF 31%. Today the usage of TIFF on websites is around 0.016%. On the down size JPEG uses 'lossy' compression, so there is some loss of quality in using it. Usually this loss in quality is minimal for most types of images used in webpages. The PNG format is lossless, is often used for screen shots, graphics, etc., and supports transparency. The GIF format is ideal for animations. There are a number of useful articles on the basics of using one of other image file format, for example Google has a page on Image Optimisation that spends some time looking at the XML-based image format SVG (scalable vector graphics).
I had some specific problems with moving TIFF images into pages in both Sandvox and RapidWeaver. The TIFF (Tag Image File Format) has always been recognised as the best file format for high-quality, continuous-tone photography intended for print. It is also recommended when scanning photographs destined for long-term archival. TIFF supports layers used in digital imaging editing, but the file size is usually too big for use on a webpage (bloatware). It would appear that in the past TIFF was supported by web browsers, but this appears no longer to be the case, except with specific plug-ins. Some experts have suggested that the reason for no longer supporting TIFF is the fact that TIFF images often use an alternative colour space such as CMYK and contain printing information such as spacing, layout, and colour density. Other experts noted that originally TIFF used a compression scheme called LZW, but more or less everyone moved to an uncompressed format when license litigation started in 1993-94. And that meant downloading megabyte blobs which browser developers wanted to avoid. I'm note sure about that as a problem since GIF uses the same compression scheme. Another problem with TIFF was/is that it is not a streaming format, so the entire file needs to downloaded before it could/can be displayed. Another reason for browser developers to avoid TIFF.
TIFF was at one time the most accepted standard document storage format for digitised legal documents, although PDF/A increasingly became recommended by national administrations. Today PDF is recognised as providing document security, compliance with legal requirements, accessibility requirements, and archiving requirements. PDF is also text-searchable, print friendly, and provides faster web viewing and document navigation. Enough said, TIFF is to be avoided on websites, and we should keep to JPEG and PNG.
RapidWeaver General Settings
One of the first things I looked at were the 'General' settings. Here we find my website title and slogan found across the banner, the custom image I use in the banner, and my website footer with my email address for the 'Contact Me'. I also added a banner comment, a web clip icon, and a favicon.
There is also a series of options entitled 'Advanced …', as we can see below.
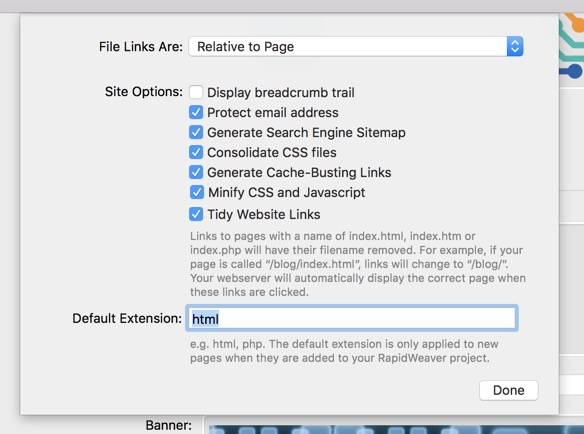
The first option is 'File Links Are:' and the default is 'Relative to Page' (alternatives are either 'Relative to DOCROOT', or 'Relative to Website Address'). Links can be absolute, i.e. the usual complete http://…. address in a link, or they can be 'relative'. This means that the server knows where the current document is, and if the link is to another document on the same server we can just use the filename or file path and not write the full URL. Using 'Relative…' is said to use less overhead on the server, but it would appear that most experts recommend always using absolute links because crawlers can miss (or mess up) some relative links. I left the default, but always include the complete URL in all links.
'Display breadcrumb trail' simply says that the template or theme being used can use the 'breadcrumb' in its layout. A 'breadcrumb trail' is just a navigational aid that allows the user to see where they are within the website, and to rapidly navigate back to a 'parent' webpage. With the template I'm using the 'breadcrumb trail' appears just underneath the banner (the footer option in 'Master Style' is switched off).

'Protect email address' treats the risk that people try to harvest email addresses from websites. I may be wrong, but I think this only protects the email address on the bottom of the webpages (i.e. my email address) from being harvested. I don't think it protect email addresses embedded as links in webpages. For websites collecting emails of clients, etc. for things such as newsletters it is certainly better to install some form of specific protection. Of course if a visitors clicks on 'Contact Me' it opens an email form showing my email address.
This is a problem, but what to do about it? There are email scrappers that harvest email addresses from webpages (also on secure https:// websites), and at the same time hide the attackers identity. Several people have suggested to avoid using the 'Contact Me' and to adopt a Contacts Form.
'Generate Search Engine Sitemap' means that a sitemap.xml is generated which includes a list of links to all the page on the website. You can use the Google Search Console and see the sitemap. If the site's pages are properly linked the search engine will be able to discover all of the content. The exact procedure is here. My understanding is that the different search engines agreed on a XML protocol for sitemaps. A sitemap does not affect ranking, but it does allow search engines to make more accurate rankings and searches.
'Consolidate CSS files' is a more specialised option. CSS are Cascading Style Sheets, or a language used to describe the presentation of an HTML or JavaScript document. This option just means that different CSS files will be consolidated into one CSS file. Many experts suggest that the only reason you might want to use this option is if you are using Internet Explorer and have more that 31 style sheets that must be consolidated. Experts appear divided on this. Consolidation can hinder troubleshooting, but can improve page speed on a website. One comment I saw said that this option was needed if you wanted a 'back to top' button. Who knows? I want the 'back to top' button, so I've ticked this option as well.
'Generate Cache-Busting Links' is yet another specialist option. You want the webpages viewed by a visitor to be fast, and you want to reduce strain and bandwidth usage on your server. The idea is that static assets should be cached by the visitor's browser with a very long expiry data. However if you have made changes to your website you will have to force a hard refresh to get the browser to download the changed version of the assets. Apparently 'cache busting' tells the visitors browser that a change has been made in a static asset, and that the new file is actually different and should be downloaded (and not retrieved from the cache). A 'cache buster' might be used to prevent a browser from reusing an ad that has already been seen and cached. This technique is used to provide a more accurate count of the number of times an ad may have been presented to a visitor. It is also used to ensure that someone is presented with the updated version of a pdf document, despite the fact that they may have already downloaded a previous version.
'Minify CSS and JavaScript' is yet another specialist option. Minification removes all the unnecessary characters from the code without changing its functionality. There was one comment that a developer had had problems exporting an entire site until he turned off 'minify CSS and JaveScript'.
Consolidation and minification together aim to improve webpage download speeds.
'Tidy Website Links' actually has a comment telling us what it means. The presumption is that each webpage is in a separate uniquely named folder (such as …./blog/index.html) and therefore RapidWeaver simply removes the mention of 'index'. The idea is that the server will serve 'index' pages first anyway, and thus it does not need to be specified (given that the only webpage in the folder is called 'index'). As far as I can tell this type of link (i.e. missing the /index.html) is called a 'cruftless' link, but I'm not sure why, nor who invented the idea (although it appears to be associated with RapidWeaver). Obviously 'cruft' refers to some extra stuff in a link that is not needed. Because if we always name our webpages 'index…', then browsers will always load that page first, so as the saying goes we can 'strip the fluff' from the links.
'Default Extension:' is just that. It inserts a default filename extension to files such as 'index.html'. However the tip is to use .php as a default, i.e. 'index.php'. Whilst I don't really understand what is so special about .php, I understand that some pages might need .php, and there is no downside if it is used as the default for everything.
RapidWeaver Master Style
The second thing I looked at was the 'Master Style' for the template. This provides a number of options that are valid across all the webpages on the website. The key change I made to the template was to remove side-bars from all the webpages, thus exploiting the entire width of the page and screen. The other options I took were to 'justify' text, to deselect uppercase for navigation (menu) options, and to install the 'back to top' button. There is one option entitled 'StyledText + Blog: Fluid Image (edge to edge)' which just expands all embedded images to the full width of the screen, and I think the idea is that it will re-adjust the image widths as a function of the display right down to smartphone screens. I did not use this option because I don't find it an elegant solution for many of the smaller average-quality images I have embedded on my webpages. The last thing I did in 'Master Style' was to increase the visibility of the links, by changing the colour and intensity settings.
Folders and Filenames
It is useful right at the beginning to have some clear ideas about how to organise the folder structure for the website. I am using 'Styled Text' webpages and they automatically configure themselves on my host as /'site_name'/web/content/styled-nn/index.html, or with nested webpage /'site_name'/web/content/styled-nn/styled-nn/…/index.html. In fact the suggestion is to rename the folders to make titles self-explanatory and the folder structure easier to understand. For example, /'site_name'/web/content/exhibitions/london/monday/index.html is far easier to understand than a series of nested 'styled-nn'. Experts also remind us to have 'Tidy Links' on in the Advanced… settings under 'General Settings' (remembering that 'Tidy Links' only works when the pages are named index.html or index.php). I've seen comments suggesting that search engines like a nice structural and consistent navigation menu (i.e. folder structure and naming) using keywords, and they also like the 'breadcrumb navigation' aid.
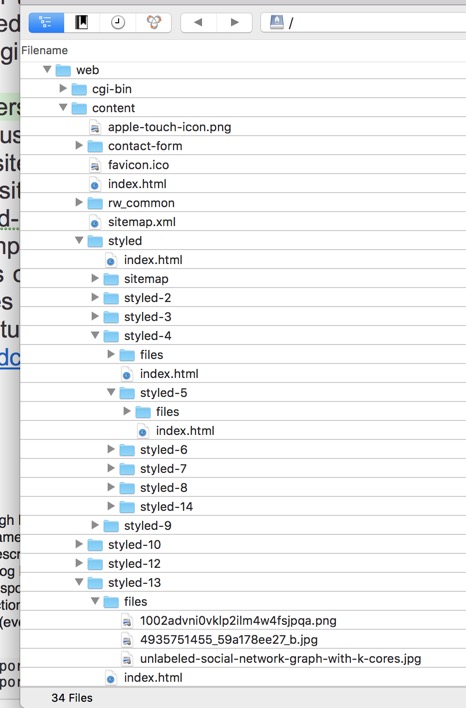
Above we have what we might call a 'native' or 'out-of-the-box' file structure for a set of simple test pages. We can see things such as the contact-form, rw_common and sitemap folders, the favicon, the home page 'index.html', and sitemap.xml. We can see that inside each page folder (e.g. 'styled-nn') we have a webpage 'index.html' and when necessary a file folder for the images found on that page. The point being made here is that the file structure in not intuitive. We can also see that the image names are unhelpful.
What we need is an easy to understand file structure that is both simple and informative. Let's take an example. Part of this website will be dedicated to visiting different places (sites, museums, etc.) in different towns and cities around the world.
So rather than seeing an incomprehensible
styled-4/styled-10/styled-14/styled-8/index.html
we want to see
travel/château_de_la_loire/abbaye_royale_de_fontevraud/index.html
Here we have a page 'index.html' dedicated to our visit to the Abbaye Royale de Fontevraud which is placed in its own folder entitled 'abbaye_royale_de_fontevraud'. So all we have to do is change the folder name in the webpages 'inspector' and RapidWeaver will build the folder hierarchy accordingly.
Just as a note, let us imagine that we had our incomprehensible '/styled-4/……' sequence of folders already published on the server. Now we change the filenames to the more intuitive ones, and re-publish. If we were to look at the server we would now see both sets of folders and files. So a re-publish with a different folder name does not replace the old folder. We would have to edit/delete separately all the old folders. All the more reason to plan ahead and decide on a workable and easy to understand folder hierarchy.
Just as a marker to which we will return, we also need to ensure that we have a good 'Bowser Title' and a good description in the 'Meta Tags', that we put a 'title' on all links, and that we describe properly the Filename and Alt Tag on all the images used.
And I will also mention here the importance of 'Headers' in the webpage text. These are also meta tags and are looked at by the search engines, even if they are said to attribute a lower value to their content as compared to 'Browser Title'. Nevertheless it is important to make 'Headers' useful in the context of the webpage, but not to spam them with too many keywords. In addition there should be only be one 'Header 1' and it should be at the beginning of the webpage. Long webpages should be broken into a logical structure using 'Header 2' and occasionally 'Header 3'.
You can test to see if Google can crawl your webpage using Fetch. Google has a Search Console with Fetch, and with two other tools, one to generate a crawl error report, and the other a search analytics report. You have to register and sign-in to use the tools.
RapidWeaver Page Inspector
When on a specific webpage the 'Page Inspector' provides access to a variety of options: General Settings, Page Sidebar, HTML Code, Meta Tags, Page Style, and Page Options. The two sections important for us are General Settings and Meta Tags.
Browser Title
In General Settings in 'Page Inspector', I always input a 'Browser Title', which is the title that appears across the top of the browser page. It is the most important meta tag on a webpage so I try to ensure that it is unique, distinctive, descriptive and containing keywords that help understand the subject of the webpage. Many experts suggest that the keyword should appear in the first 2-3 words of the 'Browser Title', and it best to keep to a maximum of two keywords per title. The 'Browser Title' or title tag (I've also seen it called meta title) is also displayed on a search engine results page. The 'Browser Title' is the boldest, most obvious element in a search result and plays a major part in convincing a searcher to click through to a particular webpage (i.e. your or my webpage). In that sense it is important for usability, even if it is not that important to ranking by the search engines (presumably too easily manipulatable). It nevertheless helps both user and the search engines understand the subject of the webpage. The 'Browser Title' is more important that the webpage header, and if possible they should not contain the same keywords (to avoid an oop or 'over optimisation penalty'). One comment was to put the main and secondary keywords in the first 60 characters because Google generally displays only the first 60 characters (or more exactly 600 pixels) of the title in the search results. The 'Browser Title' also appears in the browser page tab, and therefore a good keyword at the beginning of the title helps users see what the page is about even when they have several webpages open at the same time. It was also noted that long browser titles were not penalised, but filling them full of keywords (and in particular repeating the same keywords) could be penalised.
The best description I've seen for a 'Browser Title' is 'Primary Keyword - Secondary Keyword | Brand Name'. Another expert simplified things by saying that Browser (or Page) Titles are for search engines, and Webpage Headings are for human readers. Strictly speaking this is true, but the 'Browser Title' is what a searcher sees on a results page, and the text used hopefully will convince a searcher to click through to the webpage.
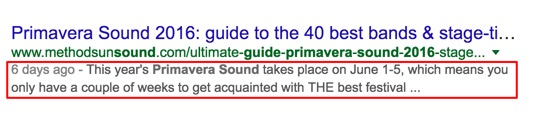
Here are a few examples of good 'Browser Titles' taken from here.


And below are the bad examples. In the first case the keywords Burger and London are not at the beginning, and there is no compelling pitch to pull the searcher to click through. In the second example the keyword 'Nike' has dropped off the end, and the inconsistent capitalisation makes the link look spammy. The third example is more complex, but it is bad to start with a negative connotation pushing the keyword away from the beginning of the title, and the title was the same as the webpage header. These mistakes make the difference between being on the first page of search results, and being on the 4th page.


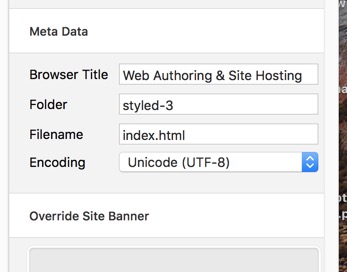
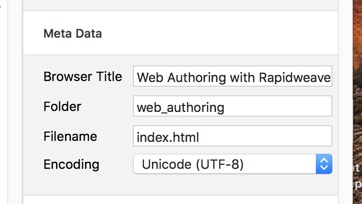
My example was somewhat different. Initially this webpage was called 'Web Authoring & Site Hosting' with the same words used for the webpage header. It also seemed reasonable to give the folder the same name 'web_authoring_and_site-hosting'. However the reality is that most of the pages content is about web authoring with RapidWeaver, so I finally settled on:
Browser Title: Web Authoring with RapidWeaver - My Experience
Folder: web_authoring
Header 1: Web Authoring - what I've learned so far
In addition, originally I had put the same text in the 'Browser Title' and in the 'Meta Tag Description', but in fact both should be different and made more descriptive.
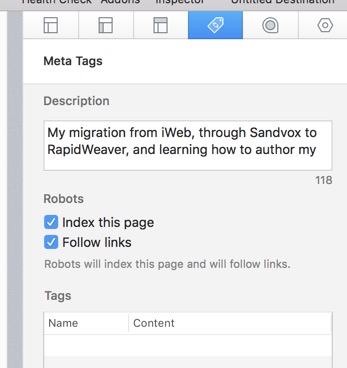
Several experts talk about meta content, with a focus on what to put in the 'Browser Title' and in the 'Description' field under 'Meta Tags'. 'Description' is a meta tag that appears both in the list of 'Tags' and in the 'Description' window. But a 'Description' should only appear once, so put it under 'Description' and leave the 'Tags' option empty. Just as with the 'Browser Title' the 'Description' is important because it appears as a 'snippet' under the webpage URL in search results.

In the good and bad examples of 'Browser Titles' we can also see good and bad examples of 'Descriptions'. The experts tell us to make the 'Description' compelling, appealing and as relevant as possible, but above all it must match the content on the webpage. Keywords are important but don't over do it, and above all make sure the 'Descriptions' on the different webpages are truly different (different webpages should not have the same 'Description'). A last point often mentioned by experts is the use of 'rich snippets', which are things like review results, well-known people, products, businesses, recipes, music, events, and video content which can be added to a webpage. These 'rich snippets' help the search engine understand the information presented on a webpage, and their markup can be used to present a richer search result. I'm not there yet, but who knows some day …
More on Meta Tags
Meta Tags are 'data about data' and are used to described the webpage contents, keywords, the author of the document, when last modified, etc. In fact there are 100's of different meta tags but we need only to looks at a few, such as 'title', 'description', 'subject', 'language', 'author', 'url', 'coverage', 'distribution', 'rating', … of which most are self-explanatory.
The reality is that today meta tags are of less importance than in the past, the search engines are good at reading and understanding HTML and are far less reliant on the meta tags. The obvious meta tags are:
'keywords' - Google tell us that keywords serve no positive purpose whatsoever, in fact they are often seen as spam, and a webpage or website can be penalised for over using or misusing keywords (so don't use the keyword meta tag)
'description' - Google tells us that descriptions are not that useful because they can extract descriptions from the HTML document, but it is suggested that every page should have a different meta description, and they must be truly descriptive, well written, unique page descriptions (no duplications of keywords but use the 150 character space)
In RapidWeaver there are two places to put meta tags with their content descriptions. The first is 'Code' under 'Settings', and the other is in the webpage specific 'Inspector' under 'Meta Tags'.
Code in Settings has a section for meta tags that are valid for the entire website and which are written on each and every webpage. I have used 'author' (bernard_smith) but some experts say that it serves no purpose. Other experts suggest to put it in, but everyone knows that since 2014 Google does not look at 'author' anyway. A few experts even suggest linking this meta tag to a separate webpage about the author and why they created the website.
Other meta tags that have their uses (but which I don't use) are 'copyright' which might even point to a webpage on the website copyright rules, 'url', 'coverage' and 'distribution'. If I were to use these meta tags they would all be valid for the entire website and appear in the HTML header of every webpage. The reality is that I can't find any compelling reason to use these additional tags.
'Meta Tags' in 'Inspector' is for meta tags that are specific to a particular webpage. One of the first meta tags that comes to mind is 'title', which is in fact an independent HTML tag. And here we have a problem, because we have the 'Browser Title' in the webpages General Settings and 'title' as a tag in the section on Meta Tags. As I understand it the 'Browser Title' adds the 'title' meta tag, and as such we should not use both 'title' tags (so I just use the 'Browser Title'). Logically the use of the 'Browser Title' is the best place for a 'title' tag, and in any case it represents the webpage name or title, and should be different from the first heading of the document since 'title' should be able to stand alone when removed from the context on the webpage (e.g. 'Introduction' is fine as a webpage header, but not as a webpage 'title'). In addition the 'Browser Title' appears on the results page just above the URL and also appears at the top of the browser page. Experts have suggested that for search engines the 'Browser Title' is the most important element for search engines after the analysis of the overall content of the webpage.
Perhaps the most challenging is the 'Description' field in the 'Meta Tags' of the webpage 'Inspector'. We have 150-160 characters to create a unique meta description which is specific and distinct for each different webpage. In an ideal world each description of each webpage should target or use just one keyword (or maximum two), and only once otherwise the page could be penalised for spamming. Some experts stress the idea to express a personal experience, others tell us that there is no need to create a long complex sentence, listing important facts is more effective.
I am not running a e-commerce website, but it is still important in writing title tags and meta descriptions to think about what the website visitor or searcher thinks is important, and what action do we want them to take next.
I've already written that the 'Browser Title' should be unique, distinctive, descriptive and containing keywords, and this is equally true for the 'Description' tag.
As a final point we are told to use the 'Home Page' description to describe the website.
Images and RapidWeaver filenames and 'Alt Tag' rules
Why some images can be seen in 'Edit' but not in 'Preview' appears to be linked, at least in part, to respecting file naming rules. What rules you may ask? Most of the images I use are dragged from the web or from my own photograph collection. Most of them have arbitrary Filenames and 'Alt Tags'. Below we can see the RapidWeaver image file description panel obtained by double-clicking on an image.
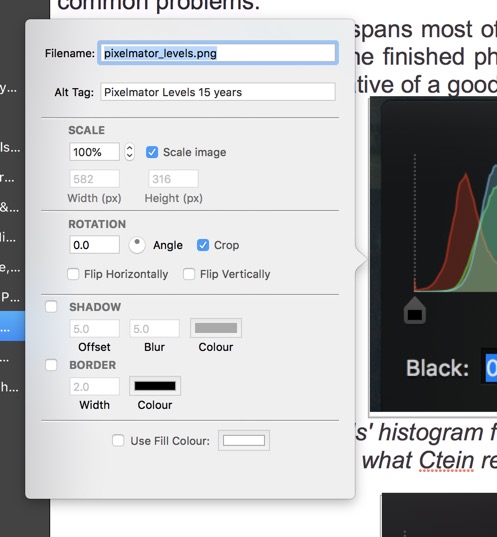
As an example if I call a PNG image '8-bit/pixel_and_24-bits/pixel' it will not appear in 'Preview' but it will appear if I call it 'eight_bits_per_pixel_and_twentyfour_bits_per_pixel'. The rules are clear - avoid spaces (use '_'), use only lowercase letters, avoid underscores and special characters (e.g. '/'), and avoid using filename extensions in the name.
The 'Alt Tag' is the technically incorrect name for 'alt text' (alternative text) which is used within an HTML code to describe the appearance and function of an image on a webpage (check out this description). The 'Alt Tag' will be displayed in place of an image if the image file cannot be loaded. The visually impaired using a screen reader will read an alt attribute to better understand an on-page image. And the 'Alt Tag' also provides an image context description to the search engine crawlers to help them index the image properly. The tag should include the essential keyword (remember no spamming), but often people just copy across the filename. The key here is to use an expression that creates a reasonably accurate version of the image for someone who can't see it.
A useful and descriptive 'Filename' and 'Alt Text' or tag can be optimised for search engines. The reality is that Google does not 'see' embedded images, but it can 'read' the 'Filename' and 'Alt Tag'. I don't care too much about getting ranked by Google, but the below suggestions are 'good practice'. First, make sure images have a purpose, and that they are needed. Second, an image that is surrounded by related text ranks better for the keywords. Third, the filename and 'Alt Tag' should describe as exactly as possible the content of the image. Make sure the keyword is there, and it is the reason why that particular image has been included, e.g. a photograph of Notre Dame should include notre_dame in the file name. The key, as always, is to include images that help the reader better understand the texts, and to include focused keywords in the 'Filename' and Alt Tag'.
Best practice for publishing images
We have mentioned sitemap.xml, and Google has some sitemap extensions for images and video. In addition Google has Webmaster Guidelines and Image Publishing Guidelines (a kind of best practice). As far as I can see the focus is on understanding and optimising for results form Google's Image Search.
Google also has a so-called 'Reverse Image Search' where you can use a picture as a search to find related images from around the Web.
RapidWeaver custom attributes to links
When setting a link to a portion of text, a dialogue box opens with the possibility to add 'Custom Attributes'. This adds custom data to the html tag. One particular reply in the RapidWeaver forum said that there was not a complete list of attributes. Another contributor mentioned that one 'Stack' developer used the custom attribute 'class' to trigger a slideshow.
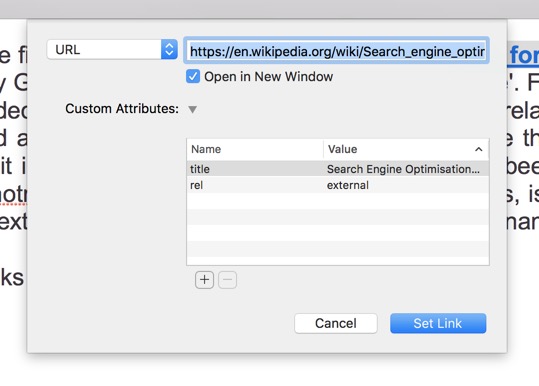
The 'Name' covers a variety of topics such as 'rel', 'title', 'class', 'key'. I have also seen 'track' mentioned as a link attribute. Here is the best list I found of all 118 attributes. In this reference we learned that "title" is a global attribute indicating a text to be displayed in a tooltip when hovering over the element.
Just for 'rel' there are many link types: alternate, archives, author, bookmark, external, feed, first, help, icon, ideas, last, license, next, nofollow, noreferrer, pingback, prefetch, prev, search, stylesheet, sidebar, tag, and up. One comment noted that 'rel' was used by search engines, and there was an advice to use rel="nofollow" to prevent giving weight to certain external links. As I understand it "alternate" links to an alternative version of the document, "archived" indicates that the target resource is archived and kept for historical purposes, "author" links to the author of the document (could be combined with 'rel-me' to chain authorship), "external" indicates that the referenced document is not part of the same site as the current document, "first" indicates that the document is part of a sequence, and link is the first logical document in the sequence, "help" links to a help document, "icon" imports an icon to represent the document, "license" links to the location of the license for the data files used to populate the current page, "next" indicates that the document is part of a series, and the referenced document is the next in the series, "wingback" gives the address of the ping back server, "prefetch" specifies that the target resource should be cached because it is likely to be required, "prev" indicates that the document is part of a series, and the previous document in the series is the referenced document, "search" links to a search tool for the document, "sidebar" indicates that the referenced document is intended to be shown in a secondary browser context, "stylesheet" means to import a style sheet, and "up" links to the immediate parent when the current document is part of a hierarchy.
Frankly, I'm not sure about using all these different features, but RapidWeaver inputs automatically 'rel-external' when the link goes to a different site. That much I understand.
RapidWeaver Publish
In building a small 'starter' website I noted 'Publish' always published the entire website, and I could not find an incremental publish option for only those webpages that have been modified.
However a 'right-click' on a specific draft webpage brings up the menu option 'Publish Page' (publishing sub-pages is also offered as an additional option). It would appear that a 'single page publish' will upload all the files associated with that webpage. If the changes made to a webpage affects other pages (or menu items) those changes will not be published. For example if you publish a page which is a parent page to others, the option to publish 'child' pages will appear. Thus it is useful to collect together pages that might frequently need to be re-published and place them in a single folder.
One person noted that if they needed to re-publish their entire website they would use File>Export Site and then upload that to the server via ftp. Otherwise they published parts of their website using 'single page publish'. A number of users suggested that 'single page publishing' works better than the so-called 'smart publish'. There is a discussion concerning rw_common which apparently is also updated when using 'single page publish'.
Resources
There is a 'Resources' place in RapidWeaver where you can 'drag' files. At the moment I can't be bothered to find out what that means in practice.
However there was one comment from a user to say that he did not use 'Resources' he simply uploaded his resources to the server via ftp, and then linked to them on his webpages.
Keywords
Reading through this webpage it is evident the keywords are a double-edged sword. On the one hand we are told that keywords can be useful to help search engines index a website, and on the other hand spamming the same keywords can be penalised. Equally understanding the (key)words people use in a search can help customise a website to their needs. Google has a Keyword Planner as part of AdWords, but for me it is too tightly linked to producing an AdWords campaign to be of much use. Google also has Google Trends which identifies popular search topics and trends, and can help isolate trending keywords. Subscription tools such as Keyword Tool, Wordtracker and Keyword Explorer can suggest how frequently one word occurs as compared to another. For example it can tell you that searches on the Mercedes GLA are more frequent that those on the Mercedes GLC. Probably the simplest way is simply to run Google searches on a selection of relevant keyword terms and phrases and see which have already been ranked, and how hard it might be to either break into a ranking, or to develop a new ranking around a particular concept or phrase. High-value keywords will have many advertisements (search ads) already associated with them. To understand better the way Google handles keywords have a look at this 2016 article "Tactical Keyword Research in a RankBrain World".
When one thinks of keywords the tendency is to focus on simple words or phrases, e.g. 'Mercedes GLA' or 'Hotel Costa del Sol'. Initially the aim might be to get on the first results page of such a query. This could be expensive and it actually only involves about 30% of the searches on those topics. The remaining 70% of searches are called the 'long-tail'.
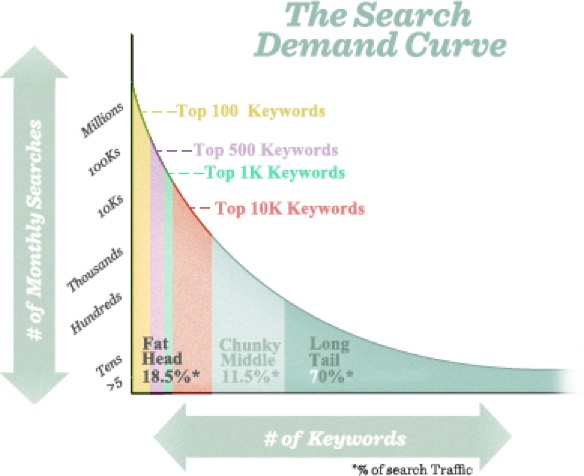
Those searchers on Mercedes GLA or Costa del Sol might be quite numerous but it is likely that they are just browsing and the conversion rate will be low. On the other hand the 'long-tail' is full of unique searches that actually when taken together comprise the majority of the world's search volume. These more precise search terms, such a 'Mercedes GLA 2016 red low milage' or 'Meliã Marbella July 4-star best price', are far less frequent, but are made by people who are later in the buying/conversion cycle.
For those people working in e-commerce it is worthwhile following the latest developments in keywords and search engine optimisation (SEO) using specialist websites such as Keyword Research, Kissmetrics Blog, AlejandroRioja, From The Future, …
The importance for me is to look beyond simple keywords, and focus on words that best describe a specific webpage, and to use them in title and description tags, and page headings.
Geo tags
Geotagging is all about adding location-specific meta-data to objects such as images, videos, etc. Naturally some photographs can be geotagged by the camera, whilst other photographs can have geographic meta-data attached to them in either an Exif or XMP format. There are services such as GeoImgr and GeoTag that will create a geotagged image. It is always useful to warn users that geo-tagging can be used to pinpoint where people live, so it pays to be careful.
Information on Geo Tags on RapidWeaver is limited to showing where a business is located. Check out this webpage and the use of MyGeoPosition.com. According to my limited understanding more advanced features of Geo Tags in RapidWeaver are managed by Stacks and/or plug-ins.
Last but not least - Validation
This entire webpage is all about how best to present my website. But how do we know that we have done the 'right thing'?
The first step before loading the webpages on to a server, is to run the RapidWeaver 'Health Check'. This is a valuable tool since it points to where corrections are needed, and suggests how to deal with each problem.
The second step is to load the webpages are to run tests on them. Here is a collection of 20 free online tools for validating the code on a website. And on top of the list is the W3C Markup Validation Service which checks the code used against the technical specifications of HTML or XHTML.
Troubleshooting
The only thing left is to list a few tricks I picked up from troubleshooting the problems I had in using RapidWeaver. I have to say that even if I don't always follow my own advice. The first thing to do is read the manual, then checkout the video tutorials, then go to and have a look at the RapidWeaver Community Platform (and there is also an unofficial RapidWeaver FAQ), and finally you have the advice and answers webpage.
Whilst not exactly a troubleshooting topic, I'm going to start with the issues around a copy-and-paste from my old webpages into RapidWeaver. The basic idea is to copy the webpage (texts and images) and paste it all into a 'Styled Text' page. It is worthwhile doing a bit of cleaning on the original webpage. I make sure all the texts are Ariel 24-type, no bold or italics, and all justified. What comes over to RapidWeaver with the text are all images left-aligned. I then 'select all', then on the bottom of the 'edit' page pick Ariel as my standard font, then bold and then un-bold everything, and then underline, and remove underline on everything. In fact one of the things I quickly learned is to conform to the exact formatting requirements of the template I'm using. Deviations can (will) produce odd results.
The underlining and then removing the underlining ensures that hyperlinks are not underlined in the final webpage. Also bolding and un-bolding everything allows me to insert 'headings' and bolded text as needed (but not as in the original webpage).
Oddly, a lot of people use Ariel as their standard font, but equally there are those who consider Ariel the "poor mans Helvetica". Originally designed by Microsoft as a way not to pay royalties, it is criticised for having equal spacing for all characters. However other experts have written that Ariel is one of the fonts unofficially recommended by the U.S. Department of Health & Human Services as an 'accessible' website typeface. In addition tests have shown that people find the Ariel font one of the most readable, along with Verdana.
Blank lines are another thing to watch for. They are automatically inserted around 'headings' and as far as I can see a blank space at the end of a paragraph can produce a blank line, as can a blank space hidden in a blank line. So the rule is to clean away all blank spaces.
Publishing should be intuitive once it has been setup. In the main body of this webpage I describe the need to have a clear idea about how to organise the webpages in terms of folders. I must admit to being obliged to delete and reload my entire website several times simply because I forget to properly mark the folder names before publishing. One of those reloads actually did not work as expected. In fact the webpage styling and images were not re-loaded to my host. The browser diagnostics showed that there were a lot of missing files. I had already published the website a couple of times, so I knew that the publishing setup was correct. The solution was simply in the 'File' menu, select 'Mark all Pages & Resources as Changed', and then 'Re-Publish All Files'. Forcing RapidWeaver to re-publish the entire website again worked.
Image formats and images used in 'responsive' webpages appear to be a bit of a minefield (at least for me). Firstly, there appears to be some unwritten rules about what type of images can be used on webpages (or viewed in web browsers). Numerous sources tell us that the most common image formats are jpeg (45%) for photographs, png (23%) for figures, diagrams, screen shots, and basic images, and gif (31%) for simple animations. Photographs of text are best presented using the .png format. And .png is also better for crisp images with a low number of colours.
Why does a png image show in 'Edit' mode as an empty box (but you can click on it to see the filename, Alt Tag, etc.) but the image looks fine in 'Preview' mode? Why does this happen when I've ticked the 'Scale Image' box but left it set at 100%, yet if I un-tick the box the image in 'Preview' disappears and is replaced by a small box and a small question mark?
I can't see the direct relevance to me (yet) but I found both "Responsive Images: The Designer's Definitive Guide" and "8 Guidelines and 1 Rule for Responsive Images" particularly interesting.
In the RapidWeaver Community there were some questions about the difference between 'Ignore Formatting' and 'Clear Formatting' in the 'Format' menu.
The answer provided by one of the developers was 'Ignore Formatting' places a magic style (pink) onto the text causing it to be exported 'as-is'. This is when you need to inject a tiny bit of HTML into the middle of a 'Styled Text' and you want to disable the RapidWeaver rendering engine. The selected piece of HTML text will be shown in pink.
'Clear Formatting' removes all 'normal' styles, i.e. bold, italics, underline, etc., as well as paragraph styles. The recommendation is to not mix fonts on the same webpage, and use the edit features found at the bottom of the 'Edit' view.
There is also a third formatting option with 'Format' and then 'HTML' which provides for special HTML styles such as headings, subscripts and superscripts, etc.