How To Move to a New MacBook Pro
last update: 21 January 2022
never trust a computer you can't throw away
Occasional (and at great cost) we have to move from one generation of computer hardware to another.
This webpage tries to collect together my experience in moving from an "old" MacBook Pro to a new one.
My new laptop is/was a 14" MacBook Pro M1Pro, 16GB/1TBSSD, QWERTZ keyboard, silver, bought in December 2021 (see tech spec). This is the 5th-generation model, often called the "Apple Silicon" model because it is equipped with the new M1 Pro chips. Check the Apple add for the new MacBook Pro's.
The old laptop was a 13" MacBook Pro 2.4GHz, 8GB/512GBSSD, QWERTZ keyboard, silver, bought in early December 2019. This was the 4th-generation "Touch Bar" model.
So we moved from the 4th-generation to the 5th-generation of MacBook Pro.
Unboxing a new 2021 14" MacBook Pro M1 Pro
First things first…
Before unpacking the laptop the actual box looked a bit bigger and immediately felt heavier. In fact the new box was about 2.5 cm longer, 2.4 cm wider, and 0.4 cm thicker, than the box for my old (2019) 13" MacBook Pro.
Inside, the reality was that the new 14" laptop body is only about 0.8 cm longer, 0.9 cm wider, and 0.06 cm thicker, than the old 13" MacBook Pro.
The real difference is that the new 14" laptop weighs 230 gm more than the old 13" laptop, and that may not be much, but it's a 17% increase.
The unboxing experience was the same, designed to underline the high-quality (and high-value) attributes of Apple products. Buying a new Apple laptop, when I already have a 2019 model, is not a rational decision, but the attractive packaging still managed to stimulate the reward-seeking areas of my brain.
Removing the 14" laptop from its box, it felt a bit heavier, but it also felt bulkier. In fact the chassis of recent MacBook Pro's (like my older 2019 model) were tapered, so at the edges it actually felt thinner still. However, the new 14" MacBook Pro is not tapered, and actually has more squared-off edges, feeling more like the older 1st- and 2nd-generation models. Whilst the appearance of the new model is more "squared-off" the actual edges are now slightly rounded, and no longer have a "sharp-edge" feel. In addition, the new lid with the screen also remains very thin and flat, and is also no longer tapered.
On the other hand, the basic design is still a unibody aluminium chassis in silver or space grey, even if I have the impression that the new silver is just slightly darker than that on my old (2019) MacBook Pro. My impression might be linked to another impression I have, that is that the surface finish is slightly smoother on my old MacBook Pro.
Also on the base of the new MacBook Pro, in addition to the bigger black round feet, there is now also a large engraving that proudly announces "MacBook Pro" to your desk so that it knows its not having to support an inferior brand of laptop.
Before opening the laptop I could see that there was a major change in the connectors available. My 2019 (old 4th-generation) MacBook Pro had four Thunderbolt 3 ports that supported USB-C. So any of the ports could be used for charging, but the MagSafe power connector was discontinued, as was the little LED that showed that battery was charging (red) or fully charged (green).

This new 5th-generation laptop now has recovered several ports that had been removed in 2016. Apple has a useful webpage on what the different cable connections look like, and what adapters you might need.
Originally released in 1996, the USB (Universal Serial Bus) standard was created by a group of companies including IBM, Microsoft, Intel, and others, and maintained by the USB Implementers Forum. The idea was that it would be a standard that would work across different devices, and cables would use one specific type of connector and the wires within a cable would work in a specific way. USB also enabled power to be provided to the device at the same time, which helped cut down on the number of cables a user needed to manage in their setup. It was only in 2014 that a new a new connector was introduced, USB Type-C, but it only started to be adopted in 2019 when 20Gb/s was offered with USB 3.2 hardware. Check out the nice timeline below from a plugable article.
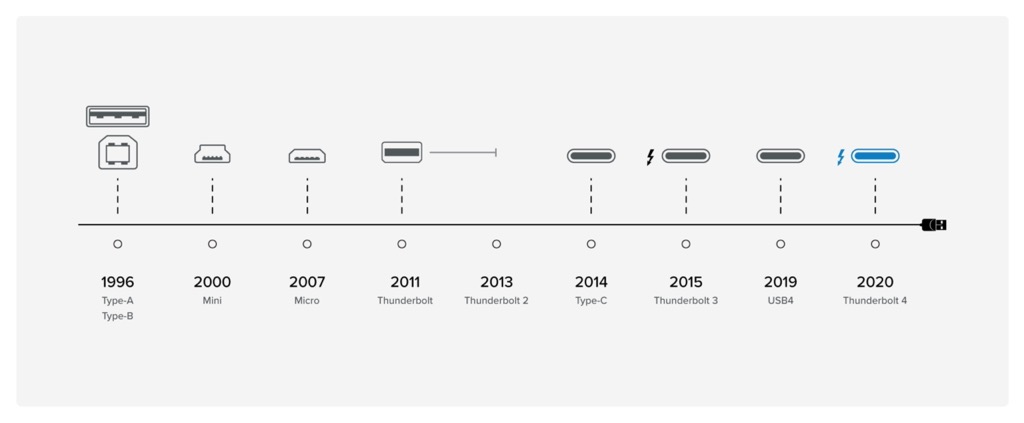
Thunderbolt, a collaboration between Apple and Intel, is an alternative to USB that was brought to the market in 2011. Compared to USB, Thunderbolt aimed to offer a fast data rate of 10Gbps for each of two channels, 20Gbps in total. An important part of Thunderbolt was its ability to daisy-chain devices together, with the original Thunderbolt able to handle up to six compatible devices in such a chain. Due to its ability to handle both data and video signals, Thunderbolt also allowed for the connection of displays. Already in 2013 Thunderbolt 2 could handle 4K-resolution video on a monitor. Thunderbolt 3 was a step up from Thunderbolt 2 with an increase of bandwidth up to 40Gbps. As Thunderbolt 3 used the USB Type-C connector, devices using Thunderbolt 3 also typically included support for USB hardware that uses Type-C connectors. These devices worked at the same speeds as the USB standard it uses, not Thunderbolt 3's faster speeds. By employing USB Type-C connectors, Thunderbolt 3 devices were able to deliver up to 100W of power to run other hardware.
USB-C, which works with USB 3.1 and later generations, introduced more contact points and wire pairs to the mix, but perhaps most importantly you could insert it in both orientations. USB Type-C connections could provide up to 100 watts of power, enabling it to recharge hardware like a MacBook, while also using the cable for data transfers.
This article on AppleInsider is a great review of the situation today.
So with my new 2021 MacBook Pro M1 Pro I now have only three Thunderbolt 4 ports instead of the four Thunderbolt 3 ports. What's the difference? Firstly Apple actually calls the new port a Thunderbolt 4/USB4, but it's comforting to know that its backward compatible to the older Thunderbolt 3 (they all share USB-C, which is just a physical connector standard and not a communication protocol). The Thunderbolt 4/USB 4 ports support charging, up to 100Gb/s (USB 3.1 Gen 2), up to 400Gb/s (Thunderbolt 3), and are DisplayPorts. I've read that Thunderbolt 4 laptops have to be able to support two 4K displays or one 8K display. This just means that I can use two of the Thunderbolt 4 ports to support two different monitors (overkill for my needs). There appears to be a number of more "techie" type advantages to Thunderbolt 4, but frankly I did not see the difference (I discuss connected my monitor later on this webpage). A good point made in one of the reviews was that Thunderbolt 4 supports a hub that can have more than two Thunderbolt ports (I'm told I could always daisy-chain Thunderbolt devices, but now I can hub four Thunderbolt compatible devices). There is a discussion about Thunderbolt 4 and USB4 pros and cons, but I'm not that interested in it. I will try to focus on Thunderbolt 4 certified devices (when they appear in the market), and worry about things later if that causes me problems.
Despite not really noticing the four Thunderbolt 3 ports on my old MacBook Pro, I found myself connecting to power, a monitor, a backup drive, and more recently a charger for an Apple Watch. So it was interesting to see how I would manage with the new set of ports on my new MacBook Pro M1 Pro.
Several articles mention the need to use Thunderbolt 4 cables, but what's the difference? Most articles focus on the difference in the performance of the protocols, and not the cables. Some reports mention that Thunderbolt 4 certified cables will work in Thunderbolt 3 ports, but not provide the same speed and features. Also Thunderbolt cables are compatible with Thunderbolt 4 ports. You can plus any USB-C cable into a Thunderbolt port, and they should operate at "USB-C 3.2 Generation 2x" speeds (whatever that means). Because Apple mentions Thunderbolt 4/USB 4 together, Thunderbolt 4 is listed as "compliant" with USB 4, whereas Thunderbolt 3 is now just "compatible". Interestingly Thunderbolt 4 ports are marked with the simple lightening bolt symbol, whereas Thunderbolt 4 cables have the symbol and a small number "4" under it. I guess the argument goes that if you are buying a new cable, future-proof yourself with a certified Thunderbolt 4 cable.
At least at the moment (Jan. 2022) I can't find a certified Apple Thunderbolt 4 cable, but there are available on Amazon "Intel certified" Thunderbolt 4 cables with the lightening bolt symbol and a small number "4" under it (but all are black).
It would appear that the HDMI port on my new MacBook Pro M1 Pro is (unfortunately) only HDMI 2.0 and not HDMI 2.1, so only a refresh rate of 60Hz and not 120Hz. As one review article noted, it's not a "deal breaker".
The SD card slot supports UHS-II, with a transfer rate of 250MB/s. I can't remember using it on my old MacBook Pro's, but review articles say that professionals will use it to transfer photograph and video files, without the need for an adaptor. There are reports that it's not working perfectly and can freeze up the laptop, etc. Still, I never used it anyway, and doubt I will use it in the future.
The 3.5mm headphone jack, along with the speaker system, is touted by Apple as the "best audio system in a notebook". The headphone jack works with high-impedance headphones, i.e. is capable of driving 1,000 ohm headphones (high impedance is usually above 100 ohms). The physics is that the voice coil creates an electromagnetic field, which reacts to the permanent magnet which then causes the diaphragm to move, so translating an electric signal into a sound. The thinner the wires used to make the coil, the more times it can be wound round the driver, with less air space, the stronger the electromagnetic field and the higher the impedance. The idea is that a high impedance rating means that the headphones are less sensitive and require more power to drive them, but are expected to offer a more dynamic audio quality with less distortion. The jack is still limited to 96 kHz sampling rate (same as with the older MackBook Pro) and not the 192 kHz rating of the music streamed by Apple Music (and other services). One of the things the new MacBook Pro has is DC load detection and adaptive voltage output, so it detects the impedance of the connected device and adapts its output for low- or high-impedance headphones. If you need to better understand headphone impedance check out this article.
The MagSafe power connector is back. I remember it on my older MacBook Pro's and it was a really neat thing. I remember catching the charging cable several times and not send my laptop flying onto the floor, the connector worked wonders (however I never sent my laptop flying onto the floor when connected with the USB charging cable either). It now appears to be called MagSafe 3, and there are a couple of good differences from past versions. Firstly it is not permanently connected to the power adapter, but now connects using USB-C. Secondly the MagSafe to USB-C cable is now a braided nylon coated cable, and is much easier to wrap-up and pack, etc.
In terms of battery life, Apple claims a dramatic improvement with up to 17 hours Apple TV app movie playback and 11 hours wireless web browsing. This is probably enough for most people, including me.
What else?
After I had lifted the laptop, felt its solid construction, looked at the new set of ports on either side, noticed the more solid flatter feet, plugged it in and saw the little red LED on the MagSafe, etc., it was time to open it up.
With the lid open, there are some clearly visible differences between my old (2019) laptop and my new (2021) MacBook Pro M1 Pro.
Firstly the keyboard (sorry "typing experience"), and the absence of the Touch Bar (a 4th generation feature) with the Touch ID sensor. What we see is a redesigned all-black keyboard, a row of full-size function keys, and a Touch ID ring that unlocks the laptop.
The "new Magic Keyboard" is not much bigger that that on my old MacBook Pro (including the TouchBar), but because the entire surface is all-black it looks bigger, and dare I say a bit more old fashioned. On my old laptop the black keys were set within a silver (or space grey) aluminium plate that was part of the body. Now the black keys are surrounded by a black anodised aluminium insert.
My old MacBook Pro had what was called the butterfly keyboard. This reason for the new design was to create a keyboard that was thinner and more sleek looking than the competitors. The basic idea was to replace a "X" shaped support that compressed like the blades of a scissors, with a "V" shaped key support in the shape of butterfly wings. Naturally the new design was said to produce less errors and would be more durable because there was 40% less movement.
The real problem was that debris and dirt could more easily get under the butterfly keys. And replacing a key was a complicated problem that required the whole machine to be disassembled in an Apple repair centre. I never had any problems with the old keyboard, but some of the reviews of the new MacBook Pro concluded that the keyboard was now "a keyboard you can actually type on". My first impression was that the key travel a bit more on the new keyboard, but for my level of skill, etc. they felt more or less the same. So we will see!
The Touch Bar has been replaced with a set of 12 function keys include new shortcuts for Spotlight, Siri, Dictation, and Do Not Disturb, in addition to the usual shortcuts for display brightness, media playback, volume, and more. Apple didn't comment on its reason for removing the Touch Bar, but said that the return of physical function keys brings back the "familiar, tactile feel of mechanical keys that pro users love" (who believes this stuff?). Judging from the comments, etc. the majority of people did not take to the Touch Bar. I remember ignoring it, but slowly got round to using it to control the display brightness and volume. So I don't really care one way or another about the Touch Bar, I'm just happy they did not play too much with the Touch ID.
I can't really comment on the Force Touch trackpad in my new MacBook Pro M1 Pro, except that it's just a bit smaller than on my older (2019) MacBook Pro.
The two loudspeaker grills on the new MacBook Pro M1 Pro are bit wider, but are they any different from the ones on my old (2019) MacBook Pro? I already mentioned that Apple now claims that the new laptop has the "best audio system in a notebook". The new laptop features a six-speaker sound system with 80% more bass. The speakers include two, larger tweeters and four force-canceling woofers that Apple says can go half an octave deeper than before. It also includes a "studio-quality" three-microphone array that has a 60% better signal-to-noise ratio and directional beamforming.
Before turning to the new screen and "the notch", we should not forget the hinge. People tend to ignore the technology associated with a hinge. Yet it's remarkably solid and also houses the connection between the screen and body of the laptop. Check out this article to learn what the hinge does, and what it will look like in the future.
In fact the hinge has been redesigned to better accommodate clamshell mode. In the old 2019 Intel MacBook Pros, the hinge would cover the rear exhaust vents completely when shut, forcing hot air to travel downwards. This setup caused accelerated overheating when in clamshell mode and on a flat surface like a table. This also meant that the hinge would cover the vents when the MacBook was open, ejecting the hot air back and away from the device while in use. The hinge design has been completely overhauled in the 2021 MacBook Pros. In the new version, the rear exhaust vents are visible even when completely shut. This means hot air is ejected back and away from the device even when in clamshell and flat on a table. When the new 2021 MacBook Pro is opened, the clever new hinge rotates to expose the vents towards the top screen. This makes the vents visible when looking at the MacBook Pro from a top-down eagle-eye angle. This design should promote better cooling than the old “back and away” venting style because hot air tends to rise and a vertical venting solution is able to expel more heat than a horizontal cooling solution. In addition, this new approach to cooling is also helped by the larger side vents.
New Screen
The screen on the new MacBook Pro is a so-called "Liquid Retina XDR", a mini LED backlighting technology, to which is added a 120Hz refresh rate. This means that the display uses mini LED backlights to put thousands of individual lights behind the coloured pixels. Switching this on only when needed saves energy, gives better contrast, and provides better blacks. In addition the new MacBook Pro's now offer reference modes. In normal use, the computer uses Apple’s auto-brightness adjustment, True Tone, and Night Shift modes to make the display look great in any surroundings. However, reference modes are tailored for very specific purposes and switch off all the automatic features. You can pick modes for photography, print design, digital cinema, and more. These tweak the display profile to match specific tasks.
In pure numbers the new MacBook Pro has a resolution of 3024 x 1964, and a Nits (brightness) of 1000 sustained, and up to 1600 peak. The old (2019) MacBook Pro had a resolution of 2560 x 1600, and a Nits of 500.
In a very subjective way, comparing the same desktop image on both my new MacBook Pro and my old one, the colours were both brighter and better defined on the new laptop. The difference was more than noticeable, it was impressive.
The next thing I noticed was that the screen takes up more of the lid. On my old MacBook Pro the black frame is between 8 mm and 13 mm wide, whereas on my new MacBook Pro M1 Pro the black frame is about 5 mm wide. Apple claims that the screen now occupies 88% of the body surface.
What really stands out (in particular once you have red the reviews) is the black notch in the upper centre of the display, sitting in the middle of the menu bar. The notch actually houses a new 1080p FaceTime HD camera (replacing the older 720p FaceTime camera).
Getting it wrong the first time…
I wanted to start totally afresh, but during the my initial configuration I ended up with lots of stuff pre-installed from the iCloud, e.g. Contacts, Safari Favourites, 'Recents' in Finder, etc.
One of the new features of the pre-installed macOS Monterey is that returning to factory settings is (said to be) much, much easier, since it is now a menu feature of System Preferences.
Click the Apple icon in the menu bar (top-left corner).
Select 'System Preferences' from the drop-down menu.
Select 'Erase All Contents and Settings' from the drop-down menu.
Enter the password, select 'OK.'
Select 'Erase All Content & Settings'.
I was also asked to input again my Apple ID password.
From here, the Mac went black and restarted. Some reports suggest this may happen several times, but in my case it just happened once. The instructions are to just let it happen, and don't try to turn off, unplug or interact with the computer in any way.
Some reviews wrote that the laptop would then start again with the "Hello" screen. In my case it didn't. The Apple logo appeared, followed by two screens with odd looking line-drawn graphics, and then the 'Language' screen.
Selecting UK English, I saw 'Recovery Assistant' in the top left menu bar.
The 'Activate Mac' screen told me to "select a Wi-Fi network from the menu or attach a network cable to proceed", but there were no network options offered, and the 'Next' was blanked out. The only option was 'Restart'.
At this point I went though a totally fruitless routine, which I include below just to demonstrate both my stupidity and the lack of user friendliness on the part of Apple.
Now I was offered two graphics for 'Macintosh HD' and 'Options' (system gear icon), with either 'Shut Down' or 'Restart'.
Clicking on one of the two graphics, opened a 'Continue' button, which suggested a 'Restart'. Selecting 'Continue' on either option brought me back to the same screen, through a reboot with the Apple logo.
Clearly the next option was to select 'Macintosh HD' and 'Shut Down', which it did. Starting up again just got me back to the same 'Macintosh HD' and (System) 'Options' dead-end. Selecting (System) 'Options' and 'Shut Down' did the same thing.
However, not selecting anything but pressing the power button got me back to the 'Language screen' where I could select (again) UK English.
The 'Recovery Assistant' menu offered three options, 'About Recover Assistant', 'Change Language…', and 'Erase Mac…'.
The 'Erase Mac' message was "If you are unable to unlock this Mac, you can fully erase it and reinstall macOS. This will delete all media, data and settings on all volumes on this Max. An internet connection will be required to reactivate this Mac and reinstall macOS". And there was the option to 'Erase Mac…'.
Selecting 'Erase Mac…' led to a "Are you sure …..". And the option to still 'Erase Mac…'.
The Apple logo appeared (again) with the two screens with odd looking line drawing graphics (again), and then 'Language screen' (again). I selected (again) UK English.
The 'Activate Mac' screen reappeared, still with no network options offered, and the 'Next' was blanked out. The only option was 'Restart'.
Time to try another approach, but restarting and holding down "Command" and "R" did not work.
My problem was that I expected the network options to appear in a box on the 'Activate Mac' screen, whereas in fact I was expected to click on the greyed-out antenna icon in the top right-hand part of the menu bar. Now I could (finally) see the network options, including my wi-fi network.
Back to square one. Apple has a webpage "If your Mac doesn't start up all the way", and that includes my problem "Options with a gear icon".
I followed scrupulously the routine proposed and landed on the 'gear' screen, but this time without the 'Macintosh HD' option. This time I was able to 'Continue' through to the 'Activate Mac' screen that I had already seen (as part of the 'Recovery Assistant'). I didn't see the 'options' mentioned in the Apple Support page, nor the Disk Utility, nor Apple Diagnostics, etc.
However, rechecking the menu options I finally (stupid me) clicked on the options on the top right of the menu bar.
There was the 'Battery' icon.
There was an 'Input Source' icon (I was using ABC-QWERTZ), which blanked out once I had looked at it.
And (finally) there was a greyed-out wi-fi icon. Clicking on this opened a list of wi-fi signals, including my home network.
I input my wi-fi password. A word of warning, because having looked at the 'Input Source', and despite selecting ABC-QWERTZ it reverted to a different keyboard (looked like QWERTY). So I had to be careful to input the right password characters.
Once input, the 'Activate Mac' screen showed the message "Your Mac is activated", and an "Exit to Recovery" option.
I first select the Disk Utility which showed a macOS Base System with 1.82GB of 1.94GB used, and an empty Macintosh HD with 994.66GB free. I ran First Aid which showed that there were no errors that needed repairs.
I now returned to 'Reinstall macOS Monterey', and finally received the message that it would take about 3 hours to complete the reinstallation (it quickly tuned to about 4½ hours, before dropping back to about 4 hours).
The reality was that less than 1 hour later, the Setup Assistant appeared.
Configuring my new MacBook Pro
As already mentioned I did not want to configure my new MacBook Pro by simply migrating an existing configuration from my previous MacBook Pro.
Set up your MacBook Pro runs through the country/region, accessibility options, wi-fi connection, information transfer, sign-in with Apple ID, iCloud, Siri, etc.
One of my first decisions was to select 'Not Now' for the Migration Assistant, which offers to transfer information from another Mac or a Windows PC.
I also decided to 'Set Up Later' the option to Sign In with Your Apple ID.
Like every sensible person I read and agreed to the Terms and Conditions, but frankly it was both a waste of time and totally incomprehensible in equal measure.
Next came Create a Computer Account. This is in fact about setting the password-protected administrator account.
An administrator can add and manage other users, install apps and change settings. The new user created during the first setup is an administrator. After entering a full name for the new user, an account name is generated automatically. A password is needed for the user, and to verify, it must be entered again.
Then came Enable Location Services, which is about allowing apps and websites to gather information based upon the current location of the laptop. This does not involve a personal identification, but uses approximative location data from local wi-fi networks. The idea is that the location data is sent to Apple so that they can better optimise a Spotlight or Safari search query, however Apple will anyway use the IP address to approximate a users location. Given that it's possible, and even advisable, to specify which apps and system services can use location services, I decided not to enable location services during setup.
Having not enabled location services, the next setup task was to Select Your Time Zone. The problem is that without a location, it appears to default to Pacific Standard Time, but in fact it will recognise most major cities world-wide (and will set the time and date accordingly).
Under Analytics I opted not to share with Apple or app developers.
I also decided to set up later Screen Time, and not enable Ask Siri.
But I did enable Touch ID and I picked the light Look.
The setup session closed with the message that the new laptop's local hostname was set at "Name-MacBook-Pro-2.local" because "Name-MacBook-Pro.local" was already used by my older laptop. It was explicitly stated that "To change the local hostname, open System Preferences and click Sharing, then click Edit and type the name in the Local hostname field".
In very simple terms a local hostname is the way a computer on a local network is uniquely identified. And since the default local hostname was already in use by my old MacBook Pro, the new laptop defaulted to the next available name.
A quick check revealed that Downloads, Recents, Documents, Mails, Photos, Calendar, Contacts, Music, and Bookmarks, Favourites, and History in Safari were all empty.
macOS organises items in Folders, i.e. Applications, Library, System, Users, and Home. The 'Downloads' and 'Recents' folders are under Favourites in the Finder sidebar. Both list all files in Mac's Home folder and in the iCloud Drive, sorted by date. This usually means that the last file downloaded or opened will be at the top of the list.
Both 'Downloads' and 'Recents' are just lists generated by a 'search', and not duplicates, so deleting a file from either folder will delete the original file. Deleted files can be recovered using 'Undo' in Finder>Edit, and they are also found in the 'Bin'.
'Documents' has a different origin and meaning. Music and Pictures (and Movies) manage files separately in their respective apps, but according to Favourites in the Finder sidebar, it looks like simple documents (and other types of files) must just sit on the Desktop (but they can be organised in stacks). Nor is 'On My Mac' the place for these documents. In fact, as far as I know, 'On My Mac' is reserved for files (including documents) created by third-party apps and placed in /Library/Containers, as such you can't drop documents into this folder.
Further down the Finder sidebar, under iCloud, there is iCloud Drive and Documents (along with Desktop and Shared). There is some confusion about the iCloud Drive, the iCloud "Documents & Data", and even the "Documents & Desktop" iCloud service, but there are reports that say that in May 2022 all will be merged into Apple's iCloud Drive. So let's start with the iCloud, which is Apple's cloud storage service. Opening an iCloud account is the same as creating a new Apple ID. In it's simplest form it is a free of charge cloud-based system allowing users to store heterogeneous collections of photos, documents (in iCloud Drive), separate folders for Pages, Numbers and Keynote, reminders, contacts, calendar, notes, and Find iPhone, and provides a platform for Apple's email servers.
iCloud Drive is iCloud's file hosting service, which provides a file sync service across both macOS and iOS systems (iPad, iPhone, etc.). So the iCloud Drive is home to Desktop, Documents, Downloads, Preview, Shortcuts, TextEdit, files from Pages, Numbers and Keynote, and files from certain apps. By default users get 5GB free and can rent additional space. Specifically, the documents on the iCloud Drive are those that are in 'Documents' in the Finder sidebar, so this means any files placed in "Documents" will be copied to the iCloud Drive, and will be accessible to other devices, e.g. iPad, iPhones, etc.
Another feature of the iCloud is iCloud Keychain. Apple's password management system is called Keychain, and is a macOS app that stores passwords and account information. When logged into the iCloud it will work with iCloud Keychain to sync across all devices using iCloud, i.e. Safari can access passwords and auto-fill shipping and credit card information across all devices having trusted access to the iCloud.
The iCloud can also be set up for Safari, and keep Safari bookmarks, reading list and tabs up to date.
The iCloud is also used to Sync Library in Apple Music.
Checking and optimising configuration
As mentioned above, a quick check revealed that Downloads, Recents, Documents, Mails, Photos, Calendar, Contacts, Music, and Bookmarks, Favourites, and History in Safari were all empty.
So the next step was to simply ensure that the configuration of the new MacBook Pro laptop was correct.
Starting with System Preferences
I like scroll bars to always be shown.
When changes are made to a document I like to be asked if those changes should be kept.
In Language & Region>Advanced I changed the Decimal to "." and Grouping to ",".
By default Handoff is allowed, which I switched off.
I Turned On Firewall.
I set updates to run automatically.
I switched off "Ask to join Personal Hotspots".
Handoff and Personal Hotspots are two elements of Apple's Continuity Features designed to "seamlessly move between devices".
App Preferences
I changed the default start page on Safari, and removed Siri Suggestions, Reading List and Background Image from the Start Page.
I deleted the vast majority of the default Favourites from the Start Page (using Control-click on the bookmark, then delete).
I set http://www.google.com to the default Start Page.
I blocked all cookies in Safari>Preferences>Privacy.
I switched off the Apple Pay and Apple Card option in Safari>Preferences>Privacy.
I switched on 'show full website address' in Safari>Preferences>Advanced.
I also switched on 'never using font sizes smaller than 10' in Safari>Preferences>Advanced.
In Contacts>General I de-selected 'Prefer nicknames' and 'Show Siri Suggestions'.
Installing a new computer monitor
Despite the quality of the screen on my new MacBook Pro M1 Pro, I decided to buy a monitor. Frankly it's quite difficult to decided what to buy. Firstly because the review articles all end up suggesting different "best" monitors for different tasks, and secondly you can almost never find the exact model they recommend on Amazon, etc.
I had always been happy with Sony and LG products, so I picked an LG 27UL850 4K monitor. Expensive, but surprisingly heavy, which might mean that it was very well built.
In fact one review report did suggest the 4K LG 27UK850-W as a great USB-C monitor, but is it the same as the 4K LG 27UL850 I bought?
I first connected the monitor to my old MacBook Pro using a the USB-C cable provided with the monitor. The colours were horrible.
I then connected the monitor to my new MacBook Pro M1 Pro, testing both the USB-C cable and a HDMI cable, both provided with the LG monitor.
Apple provides a webpage on using "an external display with your MacBook Pro". It told me I could connect an external display, a projector, or an HDTV with my 14" MacBook Pro. The HDMI and Thunderbolt ports on the MacBook Pro support video output and on a M1 Pro it is possible to connect two external displays with up to 6K resolution at 60Hz.
Apple tells us to use System Preferences>Displays to set how the displays are arranged, turn screen mirroring on or off, and make other adjustments to colour, resolution, and more. My guess is that Apple appears to suggest to use the HDMI port, if only because it provides a specific webpage for HDMI, but not for Thunderbolt or USB connections.
The real question was how best to configure my monitor when linked to my new MacBook Pro M1 Pro?
According to Apple a Mac computer with Thunderbolt 4 (USB-C) and HDMI ports can connect up to four external displays depending upon the model. I have only one, so it should be simple.
My initial impression was that things did not work perfectly, so I am describing below the situation after a reboot. In the answers given on problems encountered, you often see the advice to simply close the system and reboot. I did, and it worked.
Using the HDMI cable provided with my LG monitor, and looking at System Preferences>Displays>Display Settings.
One option is to select "Main display" for my Mac and "Extended display" for the monitor. What this produces is a blank monitor screen with the desktop image, but in fact what it does is to extend the Mac screen to the right so that you can drag items, windows, etc. to the right and place them on the monitor screen, i.e. effectively extending the Mac screen to the right. In fact, when opening System Preferences>Displays the image you see is the monitor screen sitting to the right of the Mac screen.
After playing around, the combination that produced a full screen version on the monitor was setting the MacBook Pro to "Mirror for LG HDR 4K" and optimised for "LG HDR 4K", with the monitor set at "Main display" also optimised for "LG HDR 4K".
Under "Displays" there were a number of additional options, namely:-
Resolution - for my New MacBook Pro M1 Pro there are two options "Default for Display" and "Scaled". Changing the resolution of your display tells us that we can select five different scaled resolutions options, which provide large more visible texts and objects, or smaller text/objects and more space for windows and apps. Apple provides advice concerning the use of a Retina display.
When using the monitor as an external display (i.e. extending the Mac desktop), it is possible to choose a preferred resolution for each display (the MacBook set at "Main display" and the monitor at "Extended display"). For the Mac display there were the five different scaled resolutions options. Whereas to see additional resolutions for the external display, you press and hold the Option key while selecting the "Scaled" button. This opens a wide range of monitor resolutions ranging from 1152 x 648 through to 3840 x 2160. In addition there was a "Show all resolutions" which inserted a number of pre-existing options, but with the added comment "low resolution" against each. I found this difficult to understand, simply because "low resolution" was set against some resolutions ranging from 1290 x 720 through to 3360 x 1890, without actually adding any new resolution options. The default for the monitor was 1920 x 1080 which rendered text in the menu bar legible, whereas a resolution of 3840 x 2160 made the menu texts so small as to be almost illegible.
Now we turn to my preferred configuration with my Mac set to "Mirror for LG HDR 4K" and optimised for "LG HDR 4K", and with the monitor set to "Main display" and also optimised for "LG HDR 4K". For the Mac and the monitor the default resolution was the largest text. To change these defaults, press and hold the Option key while selecting the "Scaled" button. The same default resolution of 1920 x 1080 is used, which (in my humble opinion) is about right for my needs, i.e. text on the monitor is easy to read.
We are told that when using an external display to mirror the Mac's built-in display, the Mac will choose the best resolution for that particular display, i.e. LG HDR 4K.
On my old (2019) MacBook Pro (with no monitor attached) only four scaled resolutions options were offered, and the default was set at the third option.
Brightness - is self-explanatory, but some users have registers problems with a blocked screen brightness slider.
"Automatic adjust brightness" - There is an ambient light sensor next to the FaceTime camera installed on the top of the display. If you hold you hand over it, the screen will slowly dim and the keyboard should light up.
"True Tone" - makes the images on the Retina display appear more natural. The display uses advanced multichannel sensors (not the camera) to adjust the colour and intensity of the display to match the ambient light so that images appear more natural. Switching on and off certainly makes the colours look deeper.
Presets - Apple provides instructions on what they call reference modes. MacBook Pro and Pro Display XDR include several reference modes that cover typical content creation workflows across several media types. The default on my Mac is "Apple XDR Display (P3-1600 nits)" which is said to the best mode for general home and office environments. This mode is based on the wide colour P3 primaries used by Apple displays and includes Extreme Dynamic Range (XDR) support up to 1600 nits (peak).
There are two other presets that might be useful, namely Photography (P3-D65) and Internet and Web (sRGB).
Photography (P3-D65) is used for typical digital photography workflows. This mode uses wide colour P3 primaries with the D65 whitepoint typically used for screen-based viewing and is designed for appropriately set up and controlled viewing environments.
Internet and Web (sRGB) is used for content creation workflows targeting the web or other internet-based uses. This mode uses the broadly supported sRGB (IEC 61966-2-1:1999) colour space per the W3C CSS Color Module Level 3 recommendation and is designed for appropriately set up and controlled viewing environments (64 lux is recommended).
Under the monitor configuration there were two additional features, namely "Refresh Rate" and "High Dynamic Range".
Refresh Rate - of a display refers to how many times per second the display is able to draw a new image. For example, if a display has a refresh rate of 60Hz, it is refreshing the image 60 times per second.
High Dynamic Range - is for playing HDR video. HDR was originally a concept that applied to photography, with HDR images combining images of different exposures together to cover a wider range of colours and brightness levels than a single exposure would allow. For example, a standard image would allow for a well-exposed photograph of a cave entrance on a bright summer's day at noon to still show things within the dark entranceway. HDR lets viewers see both the bright elements and the dark sections in higher detail than normal. The same principle applies to HDR video, in that a video captured in HDR will allow for a wider array of luminosity at both bright and dark levels. Check out this article for more information.
This article looks at what the best cable connection is for a 4K monitor. The conclusions are not that clear, but HDMI is certainly not a bad choice, but USB-C is probably just as good. Not mentioned, but Thunderbolt 4 might be a preferred choice in the future. Given that the new MacBook Pro has dedicated HDMI port and 'only' 3 Thunderbolt 4 ports, it seems logical to the use the HDMI.
Configuring services
Obviously my intention was not to "start all over again", but to rebuild, avoiding lots of (now) unused apps and configurations, dead passwords, defunct contacts, etc.
So what I wanted to do was keep the essentials, and drop all the unused and incorrect "baggage" from the past.
Sign in to Apple ID
I guessed that the only way to start (again) was to sign in to Apple ID. Entering my Apple ID and password, generated a message to my old MacBook Pro, asking for permission to allow my new laptop to sign in. You need to 'Allow', then input the 6 number code (delivered to my old laptop) into the input window on the new laptop. Once this was done, my new laptop asked me to input it's passcode (to access the laptop), and it then asked for the passcode (access code) to my iPhone 12 Pro. Successful, my new laptop then asked if I wanted to "merge Safari with iCloud?".
The message was "Your information on this Mac [my new laptop] will be uploaded and merged with the Safari stored in iCloud". But what does this mean? Given that there is no menu item called 'Safari' in iCloud, it's difficult to know what this means. Merge or don't Merge - that is the question? Is this about merging bookmarks, etc.? Does this mean that my new laptop will inherit the Safari configuration from my old laptop? Does this include passwords?
Having decided to 'Merge'. I firstly received a message on my new laptop "Allow Find My Mac to use the location of this Mac?", with the explanation "Find My Mac is part of iCloud and helps you locate, lock or erase a lost Mac". I could decide 'Not Now' or 'Allow', so I allowed it (and it asked for my laptop passcode).
On my old laptop I received the message "Your Apple ID is now being used for iMessage on a new Mac", with no choice but to OK it.
At the same time I received a message on my new laptop telling me "The name of your computer 'Bernard's MacBook Pro' is already in use of this network. The name has been changed to 'Bernard's MacBook Pro (2)'". There was the additional explanation "To change the name of your computer, open System Preferences and click Sharing, then type the name in the Computer Name field". I had no choice but to OK it.
It is not clear what actually changed whilst going through this (apparently) simple routine.
Here are the changes I found, starting with System Preferences.
As might be expected Apple ID had been copied across to my new MacBook Pro. Name, Phone, Email. Password & Security, and Payment & Shipping were now identical on both laptops, including 'Two-Factor Authentication' was On, the same 'Trusted Phone Number' was logged, 'Recovery Key' was On, and even the same three apps were logged as using 'Hide My Email'.
Looking at the iCloud configuration, there were a couple of differences, despite the same boxes being "ticked". Firstly, under iCloud Drive Options 'Desktop & Documents Folders' was not "ticked" on my new laptop, and Messages.app, Terminal.app, Garage Band.app, iMovie.app, Keynote.app, Numbers.app, Pages.app, Weather.app and System Preferences.app were missing from the list on the new laptop. On the other hand iCloud Drive.app and something called imagent.app had appeared on my new laptop. In addition, despite 'Find My Mac' being "ticked", 'Location Services' was still turned off. Finally, 'Use Touch ID for Purchases', under 'Payment & Shipping' had not been "ticked" on my new laptop.
It's not surprising that apps such as iMovie.app and Keynote.app, etc. did not reappear on my new laptop, as these apps need to separately installed. But I'm not sure why Messages.app, Terminal.app, and System Preferences.app were missing in iCloud description on my new laptop, whereas all three were in the list of Applications. Oddly, neither iCloud Drive.app or imagent.app appear in Applications on either laptop. iCloud Drive is an app in the App Store. According to some sources IMAgent listens for FaceTime invitations, and will be active even if FaceTime isn't running. FaceTime can be turned off in the app. Another source links IMAgent with both FaceTime and Messages, and is there to accept incoming calls.
In System Preferences, my Internet Accounts had been copied over to the new laptop, but in a slightly different way. On my old laptop my emails were identified under my email address, whereas on the new laptop they were identified under "iCloud". So the email address was the same but the 'description' was different. Clicking through on both laptops displayed the iCloud configuration as mentioned above.
On the new laptop Location Services was still switched off.
No data from System Preferences>Passwords was moved to the new laptop.
It is good to see that Passwords is now part of System Preferences in macOS Monterey, so we don't have to go into Safari>Preferences to find them. More important, it is now possible to import and export all passwords, in a CSV format (unencrypted plain text). Clicking on the file will open it in Numbers, which can then be printed out.
No third-party app extensions from my old laptop were added in System Preferences>Extensions.
In System Preferences>Extensions>Share Menu, selected extensions were in a different order, but the same options were "ticked".
One major change I found was that in System Preferences>Security & Privacy the Firewall had been switched off. I had previously switched on the Firewall.
Also under System Preferences>Security & Privacy>Privacy none of the access allowances previously accorded to apps had been copied over.
In System Preferences>Network a number of 'not connected' options were missing on the new laptop, only Wi-Fi was connected and Thunderbolt Bridge not connected.
————
In looking at System Preferences>Network I noticed that there was no padlock on the configuration on my new laptop. I then found that there were no padlocks on Printer & Scanners, Sharing, and Time Machine on my new laptop, whereas there were padlocks on my older laptop. Given that these preferences were empty, do padlocks appears only when needed?
————
In System Preferences>Bluetooth, each laptop had discovered the other. Devices known to the old laptop were not carried over to the new laptop, but the new laptop had discovered our Samsung TV (which was not known to my old laptop).
Under the 'account name' in Finder, config.log and a couple of app specific folders had not moved to the new laptop. The 'Desktop' and 'Downloads' content had not been copied to the new laptop, but content in 'Recents' had been copied across. In the new laptop 'Documents' had now appeared in Favourites (not iCloud), but was empty.
Even the deleted content in the Bin was transferred to my new laptop.
The bins on the two laptops appeared to be linked. Sending an item to the bin on one laptop and it would also appear in the bin of the other laptop. But bring back an item from the bin to the desktop on the old laptop did not drop the item on the desktop of my new laptop.
Content in Messages was not available on the new laptop.
Mail associated with my Apple ID was accessible on my new laptop, but not the mail associated with other email accounts to which I had access.
On Maps, even my past queries (some several years old) were available on my new laptop.
Yet deleting those old queries on my old laptop, did not deleted those same old series from my new laptop.
My entire Photos collection was available on my new laptop, including all my old albums.
My complete Calendar and Contacts were available my new laptop.
All my Music was available on the new laptop.
My Books were available on the new laptop, but nothing was transferred from my old laptop to my new laptop.
In my 'Library' I had 169 books, 1 series, 12 audiobooks, and 1,495 pdf's. All the books, series and pdf's were there on my new laptop, but only 4 audiobooks were mentioned.
Where are Apple Books kept? Below each book there is a little cloud indicating that it's kept in the iCloud, and not on the laptop. What we saw in my 'Library' was that everything except 8 audiobooks were kept in the iCloud, and those 8 audiobooks were actually kept on my laptop. This meant that no books, pdf's, audiobooks, etc. shown on my old laptop needed to be physically transferred to my new laptop. To find what is actually store physically on a Mac, in Finder go to ~/Library/Containers/com.apple.BKAgentService/Data/Documents/iBooks. There are four folders - Books, Downloads, Temporary, and Updates. In the Books folder there is Books.plist, an Audiobooks folder (containing the 8 audio files store on my laptop), and all the books that are actually store on the computer (in my case none).
Passwords
Prior to now, passwords on Mac were accessible through the Preferences interface in Safari, but the System Preferences option is easier to find. As with the prior version of the feature, Safari will suggest passwords automatically and detect compromised passwords for you.
New in Monterey is an option to import and export passwords, so you can move your logins between iCloud Keychain and other password management apps. iCloud Keychain does not have as many entry fields as some password managers, but it supports username, password, and website data.
Wallet & Apple Pay
Security and Privacy
https://support.apple.com/en-gb/guide/icloud/mmd0b4a7f5e8/icloud
Data & Privacy
Not mentioned in the setup was a 'Learn More…" on Data & Privacy, which covered:-
App Analytics - sharing crash data and statistics with third-party app developers
App Store - Apple collects information on purchases and downloads, including in iTunes Store, Apple Books and iTunes U, and offers customised advertising, personalised recommendations, and Apple marketing. They also mention that this information helps identify and prevent fraud, information about use, etc. But it also means that information about browsing, purchases, searches and downloads is stored along with the IP address and eventually the AppleID.
Apple Advertising - ads can appear on the App Store, Apple News and Stocks, but does not track users or share data with third parties. Again, the description is extensive, and is not easy to untangle.
Apple Arcade - Again, the description is extensive, and is not easy to untangle.
Apple Books -
Apple Card - "is designed to protect your privacy and security so you can focus on your financial health". The information is used by Apple and Goldman Sachs and "will be shared with third-party identity verification service providers to verify your identity and prevent fraud".
AppleID - allows the use of iCloud, the App Store, iMessage and Find My on this Mac. Data such as contacts, calendars, photos, documents, health, activity and other app data is sent to Apple to store and maintain a backup. In addition devices are associated with the Apple ID.
Apple Maps - Apple does not systematically collect data, except when information is submitted through Ratings & Photos or Report an Issue.
Apple Messages for Business -
Apple Music -
Apple Music Friends -
Apple News -
Apple News Newsletters -
Apple Pay -
Apple Podcasts -
Apple TV App -
Ask Siri, Dictation -
ClassKit -
Device Analytics -
FaceTime -
Find My -
Game Center -
iCloud Analytics -
iCloud Keychain -
iCloud Private Relay -
Improve Maps -
Improve Siri and Dictation -
iTunes Store -
iTunes U -
Location Services -
Mail Privacy Protection -
Maps Report an Issue -
Messages -
Passwords - Password are securely stored, and notification is given for weak or reused passwords, or those which may be part of a data leak. Account information such as passwords and associated usernames and or email addresses are encrypted on the device and cannot be viewed by Apple.
Ratings & Photos -
Search -
Shortcuts Sharing -
Sign In with Apple -
Siri Suggestions -
Spotlight Search -
Stocks -
Translation -
Wi-Fi Calling -
Many of the descriptions are extensive, and are not easy to untangle. The description and features of the Apple Card are particularly complex.
It appears that all these options are pre-set and must be switched off in System Preferences>Security & Privacy>Privacy>Analytics & Improvements.
Checking and optimising configuration
As mentioned above, a quick check revealed that Downloads, Recents, Documents, Mails, Photos, Calendar, Contacts, Music, and Bookmarks, Favourites, and History in Safari were all empty.
System Preferences
Touch ID - I added my Fingerprint, but only for unlocking my Mac.
Under Sharing - Screen sharing was 'Off', and access was allowed only for Administrators. However I found AirPlay Receiver was ticked, I 'un-ticked' it.
I configured Time Capsule for automatic backup.
Over time the basic configuration changes and content is added, but my objective on this webpage was to describe the basic re-configuration of my New MacBook Pro M1 Pro.
It was now ready to receive Mail, Documents, my Photo and Music collections, my Calendar and Contacts, etc.
Waste of Time
In part all my efforts to control the migration from my old MacBook Pro to my New MacBook Pro M1 Pro failed. Why? Simply because a software update asked for access to my Apple ID account, and whilst giving me some options concerning Passwords, Apple Pay, etc. it dumped a whole pile of unfiltered stuff on to new computer.
Downloads was still empty, but now Recents, some Documents (I guess those with the usual format extensions), Mail, Photos, Calendar, Contacts, Music, and Bookmarks, Favourites, and History in Safari were now copies of my old MacBook Pro. This was exactly what I did not want to happen.
However, files associated with apps that were not on my new MacBook Pro were not copied across.
And the Firewall was again switched off.
In fact Apple tells us that Apple ID & Privacy means a lot of stuff is kept on the iCloud and accessible from "devices" automatically. Which in my mind is a good thing, but means that if your contacts is a mess, then that mess will be copied across to you new laptop. I suppose it's all about where the clean-up is done.
Last steps…
Having effectively wasted my time in trying to build bottom-up a new 'clean' laptop, and being forced to see it populated by dregs from my old laptop, I was still left to install all the extras I often use, name:-
CyberDuck
Firefox
Funbridge
Microsoft Teams
Pixelmatr
RapidWeaver
The Brain
VLC